

Is the GoDaddy dashboard leaving you more confused than confident? If you’re struggling to get your new professional GoDaddy email to sync with your phone, or you’re just not sure which plan to choose, you’re not alone. That initial excitement of securing a custom domain can quickly turn into frustration when technical hurdles get in the way of looking professional.
But setting up your business email doesn’t have to be complicated. This guide cuts through the noise with simple, step-by-step instructions designed to get you from purchase to a perfectly synced inbox, hassle-free. We’ll walk you through every stage: choosing the right plan for your needs, creating your first address, and connecting it to all your devices-from your iPhone to your desktop Outlook.
By the end of this tutorial, you’ll have a fully functional email address that works seamlessly on your computer and smartphone. We’ve even included quick solutions for those common setup problems, so you can start sending and receiving emails with confidence today.
Understanding Your GoDaddy Email Options: Professional vs. Microsoft 365
Before diving into the setup process, it’s crucial to understand what you’re working with. Moving away from a generic Gmail or Yahoo address to a custom email like you@yourdomain.com is a major step in building brand credibility. It shows customers you’re serious and professional. As a leading domain registrar and web hosting company, GoDaddy provides two distinct email hosting solutions to achieve this. Your choice between them depends entirely on your needs-whether you require a simple, reliable inbox or a comprehensive suite of productivity tools.
GoDaddy Professional Email
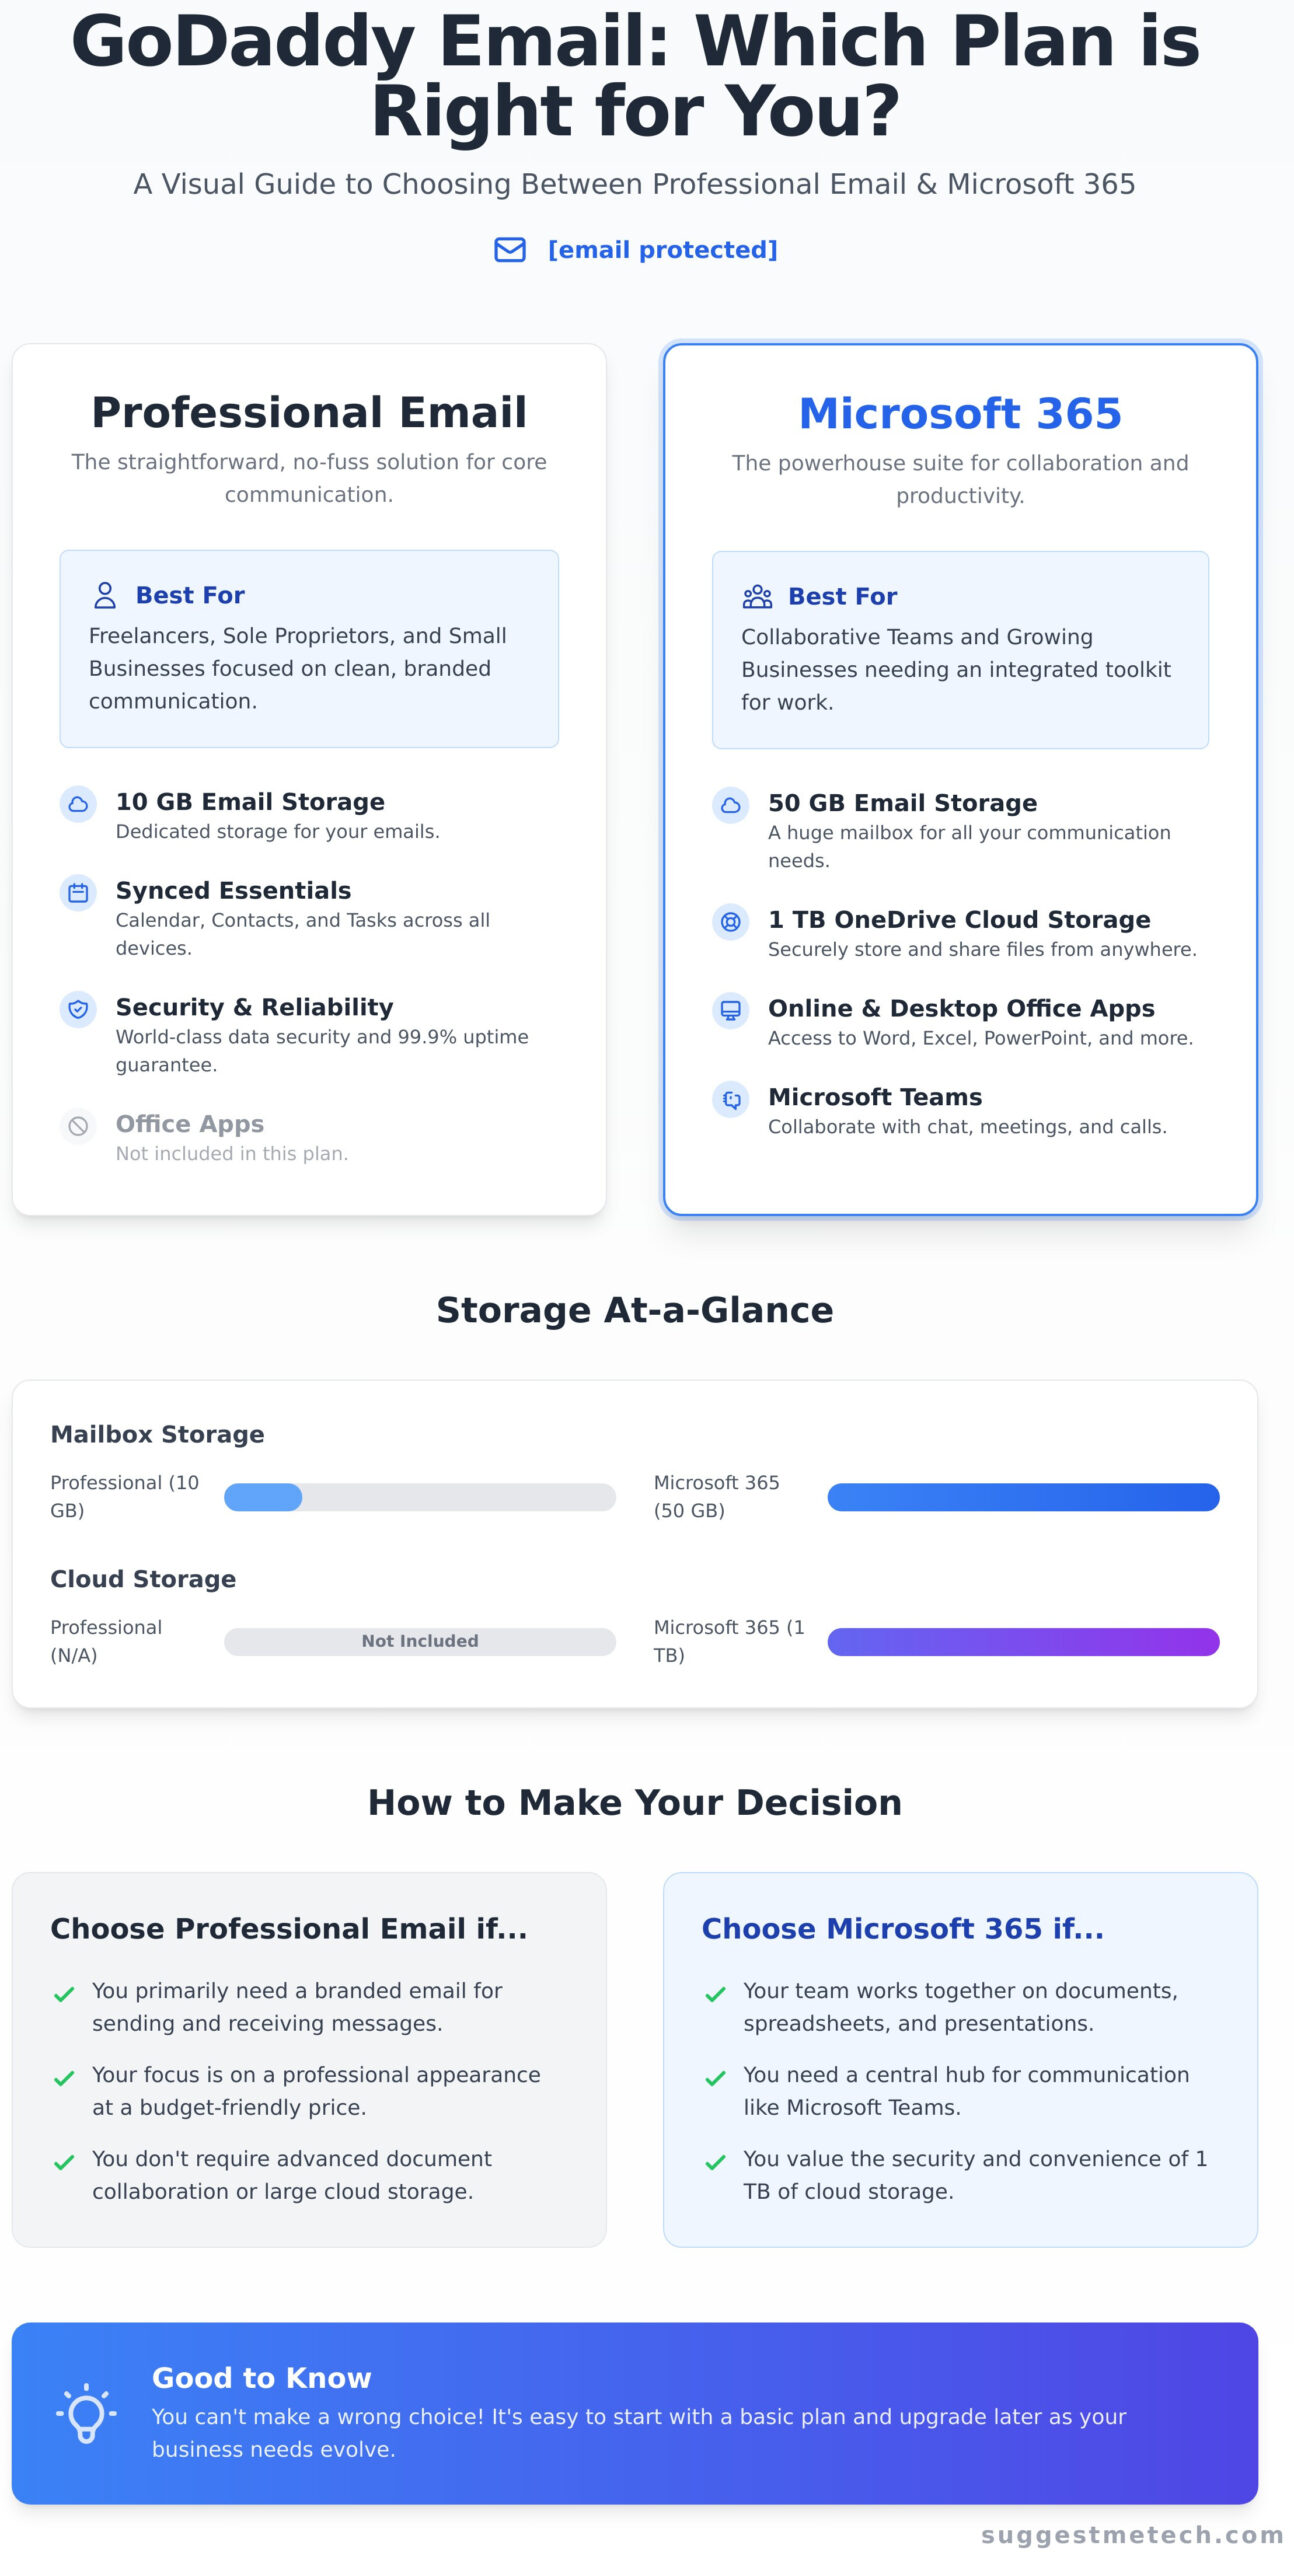
Think of this as the straightforward, no-fuss solution. GoDaddy Professional Email is an affordable option designed to get your custom email address up and running quickly. It’s built for communication essentials and is perfect for freelancers, sole proprietors, and small businesses whose primary need is a clean, branded inbox. Key features include:
- A professional email address that matches your domain.
- 10 GB of dedicated email storage.
- Synced calendar, contacts, and tasks across all your devices.
- Guaranteed 99.9% uptime and world-class data security.
GoDaddy Microsoft 365 Email
This is the powerhouse option. By partnering with Microsoft, GoDaddy offers a fully integrated office and communication suite. This plan is more than just an inbox; it’s a toolkit for collaboration and productivity. It’s the ideal choice for businesses that rely on Microsoft applications and need seamless integration between their email, files, and team communication. Core benefits include:
- A much larger 50 GB email mailbox.
- 1 TB of secure OneDrive cloud storage.
- Access to online and desktop versions of Office apps like Word, Excel, and PowerPoint.
- Collaboration tools like Microsoft Teams for chat, meetings, and calls.
| Feature | Professional Email | Microsoft 365 Email |
|---|---|---|
| Best For | Individuals & Small Businesses | Collaborative Teams & Growing Businesses |
| Mailbox Storage | 10 GB | 50 GB |
| Cloud Storage | N/A | 1 TB (OneDrive) |
| Office Apps | No | Yes (Word, Excel, etc.) |
Which Plan Should You Choose?
Making the right decision is simple when you consider your daily workflow.
Choose Professional Email if: You primarily need a branded email address to send and receive messages. Your focus is on clean communication and you don’t require advanced document collaboration tools or extensive cloud storage. It’s the most budget-friendly way to look professional.
Choose Microsoft 365 if: Your team works together on documents, spreadsheets, and presentations. You need a centralized hub for communication (like Teams) and value the security and convenience of having your files accessible from anywhere via OneDrive. While it costs more, the included software and features provide immense value.
Keep in mind that both options have multiple pricing tiers. The good news is that you can’t make a wrong choice. You can always start with a basic GoDaddy email plan and upgrade later as your business needs evolve.
The Core Setup: Creating Your First Email Account in GoDaddy
This is where your professional email address comes to life. In this section, we’ll walk through the essential steps to create your first mailbox directly within your GoDaddy account. This process establishes the account on GoDaddy’s servers, giving you a place to send and receive mail. Before you begin, make sure you have your GoDaddy login credentials and the domain name you intend to use.
Step 1: Access Your Email Plan
First, you need to navigate to the correct product dashboard. Log into your GoDaddy account and go to your My Products page. This area lists all the services you’ve purchased. Look for the “Email & Office” section and find the plan you want to configure. You will see a button next to it labeled Set Up (for new plans) or Manage (for existing ones). Click it to begin the setup process for your new godaddy email account.
Step 2: Create Your New Email Address
Once you enter the setup portal, you’ll be prompted to create your new address. The first step is to select the domain you want to associate with this email from the dropdown menu. Next, in the “Username” field, type the first part of your desired email address. This could be your name (sandra), a department (support), or a general-purpose title (info). GoDaddy will automatically combine this with your domain to create the full address, like info@yourdomain.com.
Step 3: Set a Secure Password and Finalize
Creating a strong password is a critical step for securing your account. Follow these best practices:
- Use a unique password not used for other services.
- Combine uppercase letters, lowercase letters, numbers, and symbols.
- Aim for a length of at least 12 characters.
You will also be asked to provide a recovery email address. This is an existing personal email (like a Gmail or Outlook account) that GoDaddy can use to help you regain access if you ever forget your password. After filling in these details, click the final Create button. Your account will be provisioned, which usually takes a few minutes. Once complete, your new email address is ready to be used.
Connecting GoDaddy Email to Your Devices and Apps
Once your professional email is active, the next step is to get it working where you do your work-on your phone, tablet, and computer. This section provides direct, step-by-step instructions for connecting your new GoDaddy email account to the most popular mail clients. Before you begin, make sure you have your new email address and password written down and ready to go.
Most modern email apps can detect the correct settings automatically. However, they sometimes need a little help. This involves entering server settings for incoming mail (IMAP) and outgoing mail (SMTP). Think of IMAP as the system that syncs your inbox across all devices, and SMTP as the system that sends your messages out to the world.
Configuration for iPhone & iPad (iOS Mail)
Adding your account to the native Mail app on your iPhone or iPad is a straightforward process. Just follow these steps:
- Navigate to Settings > Mail > Accounts.
- Tap Add Account.
- Select Microsoft Exchange if you have a Microsoft 365 plan. For Professional Email, choose Other, then tap Add Mail Account.
- Enter your name, full email address, password, and a description for the account. Tap Next.
- Your device will attempt to find the settings. If successful, simply tap Save.
To verify, open the Mail app. You should see your new inbox listed, and your emails will begin to sync within a minute or two.
Setup Guide for Android (Gmail App)
The Gmail app is the default client for most Android users and works seamlessly with third-party accounts. Here’s how to add your new email:
- Open the Gmail app, tap your profile icon in the top-right, and select Add another account.
- Choose Office 365 for a Microsoft 365 plan or Other (IMAP) for a Professional Email plan.
- Follow the on-screen prompts to enter your email address and password.
- If prompted for manual setup, you will need to enter the IMAP and SMTP server details provided by GoDaddy.
Once complete, you can switch between your Google and GoDaddy accounts directly within the Gmail app. Send a test email to confirm everything is working correctly.
Adding GoDaddy Email to Desktop Clients (Outlook & Apple Mail)
For desktop power users, integrating your GoDaddy email into Outlook or Apple Mail is essential for productivity. The process is often automated.
- For Outlook: Go to File > Add Account. Enter your email address, click Connect, then enter your password. Microsoft 365 accounts typically configure themselves without any extra steps.
- For Apple Mail: From the menu bar, go to Mail > Add Account. Choose Microsoft Exchange or Other Mail Account based on your plan and follow the simple setup wizard.
If you ever need to find the specific IMAP or SMTP server names for a manual setup, they are always available in the GoDaddy Help Center.
Using GoDaddy’s Webmail: Your Email on the Web
Once your account is active, you don’t need to configure a desktop or mobile app to start sending and receiving messages. GoDaddy provides a powerful webmail interface, allowing you to access your professional email from any web browser, anywhere in the world. It’s the quickest way to get started and a reliable option for checking your inbox on the go. Simply navigate to email.godaddy.com to log in.
Logging In and Navigating the Interface
To access your account, use the full email address you created (e.g., yourname@yourdomain.com) and the password you set during the setup process. The interface is clean and intuitive, designed to feel familiar to anyone who has used a modern email service.
Upon logging in, you’ll see a standard three-panel layout:
- Left Panel: Your folders, including Inbox, Drafts, Sent, and any custom folders you create.
- Center Panel: The list of emails in your selected folder.
- Right Panel: The content of the selected email.
The prominent Compose button is located at the top left. You can easily switch between Mail, Calendar, and Contacts using the icons in the main navigation bar. For customization, look for the gear icon (⚙️) to access your settings.
Essential Functions: Signatures and Forwarding
A professional email signature builds credibility and saves you time. To set one up, navigate to Settings > Mail > Signatures. Here, you can create a signature with your name, title, company, and contact information that will be automatically appended to all outgoing emails. This simple step ensures every message you send reinforces your brand.
If you prefer to manage all your messages in a single inbox (like a personal Gmail account), you can set up forwarding. In the settings menu, find the Forwarding option and enter the destination email address. While convenient, be cautious: some email providers’ spam filters can be aggressive with forwarded mail, occasionally causing legitimate messages to be missed. It’s a useful feature for your godaddy email account, but we recommend checking your webmail inbox periodically to ensure nothing gets lost. For more tech guides and reviews, explore our content at suggestmetech.com.
Troubleshooting Common GoDaddy Email Issues
Even with a perfect setup, sometimes technology doesn’t cooperate on the first try. If you’re running into trouble, don’t worry. Think of this section as your first-aid kit for the most frequent godaddy email problems. Before you dive into complex solutions, always start with the basics: double-check that your username and password are spelled correctly. A simple typo is often the culprit.
Problem: I Can’t Send or Receive Emails
If your inbox is silent, there are a few common causes. Work through this checklist to diagnose the issue:
- Check GoDaddy’s Status: Before troubleshooting your own setup, visit GoDaddy’s official system status page to ensure there isn’t a wider service outage affecting email delivery.
- Verify Your MX Records: Your domain’s MX (Mail Exchanger) records tell the internet where to deliver your email. Ensure they are pointing correctly to GoDaddy’s servers, especially if you recently transferred your domain.
- Look in Your Spam Folder: It’s a simple step, but one that’s easily forgotten. Legitimate emails can sometimes be accidentally filtered into your junk or spam folder.
- Review Client Settings: Open your email client (like Outlook, Apple Mail, or Thunderbird) and carefully re-check your incoming (IMAP/POP) and outgoing (SMTP) server settings against GoDaddy’s official configuration.
Problem: My Password Isn’t Working
Getting locked out of your account is frustrating, but it’s usually easy to fix. If you’re certain you’re typing the password correctly, use the GoDaddy password reset tool. The system will send a secure link to your designated recovery email address, allowing you to create a new password. Important: After you reset it, you must update the new password on every single device-phone, tablet, and computer-where your account is set up.
Problem: My Account is Sending Spam
If contacts are receiving spam from your address, your account may be compromised. Act immediately to secure it:
- Change Your Password: This is your most critical first step. Create a new, strong, and unique password right away.
- Enable Two-Factor Authentication (2FA): 2FA adds a powerful layer of security by requiring a second verification step (usually a code from your phone) when you log in.
- Scan Your Devices: Run a full malware and virus scan on your computer to ensure it hasn’t been infected with software that could have stolen your credentials.
- Contact Support: If the issue continues, contact GoDaddy’s support team directly. They can help investigate unauthorized access and further secure your account.
Your GoDaddy Email is Ready to Launch
Congratulations! You’ve successfully navigated the entire setup process for your new professional email. This guide has walked you through the essentials, from understanding your plan options to creating your first account and connecting it across all your devices. You’re not just set up; you’re also equipped with the knowledge to use GoDaddy’s webmail effectively and tackle common troubleshooting issues head-on, ensuring your communications always run smoothly.
Our tech experts designed this tutorial to provide practical advice and clear, step-by-step instructions perfect for beginners. Setting up your godaddy email correctly is a foundational step for building a professional online presence, and now you have the confidence and skills to manage it effectively. We believe in demystifying technology so you can focus on what you do best.
Feeling empowered? Don’t stop here. The world of tech has so much more to offer, and we’re here to guide you through it. Explore more expert tech guides and reviews to find your next project. You’re officially ready to communicate like a pro!
Frequently Asked Questions About GoDaddy Email
Can I use GoDaddy email if my domain is registered with another company?
Yes, you can absolutely use GoDaddy’s email service with a domain registered elsewhere. The process involves updating your domain’s MX (Mail Exchanger) records at your current domain registrar. GoDaddy provides the specific MX records you’ll need to enter. These records tell the internet to route all email for your domain to GoDaddy’s servers. The change can take a few hours to propagate fully.
How do I migrate my old emails from Gmail or another provider to GoDaddy?
GoDaddy offers a content migration tool to help you transfer emails, contacts, and calendars from your previous provider. You can access this tool directly from your Email & Office Dashboard after setting up your new mailbox. The tool supports migrations from major services like Gmail, Outlook, and other IMAP-based accounts. Just follow the on-screen instructions to connect your old account and start the import.
What are the IMAP, SMTP, and POP settings for GoDaddy email?
To configure your GoDaddy email on a desktop or mobile client, you will need the correct server settings. For incoming mail, use IMAP server `imap.secureserver.net` with Port 993 (SSL). For POP, use `pop.secureserver.net` with Port 995 (SSL). For outgoing mail (SMTP), use the server `smtpout.secureserver.net` with either Port 465 (SSL) or Port 587 (TLS). Always use your full email address as the username.
Is GoDaddy’s email service HIPAA compliant?
GoDaddy’s standard Professional Email plans are not HIPAA compliant by default. However, for organizations that handle protected health information (PHI), GoDaddy offers specific Microsoft 365 plans that include the necessary security and encryption features. To achieve compliance, you must purchase a qualifying plan and sign a Business Associate Agreement (BAA) with GoDaddy to ensure all legal requirements are met.
How can I increase my email storage space with GoDaddy?
The most direct way to increase your email storage is by upgrading your current plan. You can do this from your GoDaddy account dashboard under the “My Products” section. GoDaddy offers several email tiers, each with a different storage capacity. For example, upgrading from the “Email Essentials” plan to “Email Plus” significantly increases your available space. The change is usually applied to your account almost immediately after purchase.
What is the difference between GoDaddy’s old Workspace Email and the new plans?
The key difference is the underlying technology. The legacy Workspace Email was a basic, proprietary webmail system. GoDaddy’s new Professional Email plans are powered by Microsoft 365, offering a far more robust and modern platform. This change brings benefits like much larger storage, enhanced security features, better reliability, and seamless integration with other Microsoft apps like OneDrive, Teams, and the Office suite.
How do I set up an email alias or distribution group in GoDaddy?
An email alias is a forwarding address that directs messages to a single mailbox (e.g., `info@` forwards to `your.name@`). A distribution group sends messages to multiple mailboxes at once (e.g., `sales@` goes to the entire team). You can create and manage both from the GoDaddy Email & Office Dashboard. Simply navigate to the admin section and choose whether to add an alias to an existing user or create a new distribution group.