

To set up Cloudflare for your website, add your domain, review and copy its DNS records, choose a plan, and update the nameservers at your registrar. Then configure caching, security, and performance settings, and check that your DNS records and site are working as expected. Nameserver changes can take up to 24 hours for registrars to process.
It’s easy to focus on connecting your domain, but caching choices also affect what visitors see. A cached page may not show an update until the cache is refreshed or expires. This guide explains the setup sequence, which records to preserve, how to manage caching and SSL/TLS settings, and what to check while DNS changes take effect.
Key Takeaways
- Compare each imported DNS record with your existing configuration, including records needed for email and third-party verification.
- Choose cache settings based on the content: frequently updated pages may need different handling from stable images or files.
- Review SSL/TLS settings after changing nameservers to help avoid browser security warnings and connection errors.
- Use DNS checks to identify whether the domain is resolving through Cloudflare and whether the website records are proxied.
- Choose a Cloudflare plan based on the options your website needs, then revisit your settings as the site changes.
Reviewing and copying DNS records
Before changing DNS management, compare the records serving your domain with the records Cloudflare imports. Preserve website, email, and verification records, then confirm which web records should be proxied through Cloudflare.
-
Review Existing DNS Records
Open your current DNS provider’s zone and record each entry before making changes. Check the domain apex, often shown as @, and note its type and destination. The correct value depends on your website host. Also capture MX and TXT records used for email, along with records for other services. For example, omitting an MX record can interrupt incoming email after DNS management moves.
-
Distinguish Proxied and DNS-Only Records
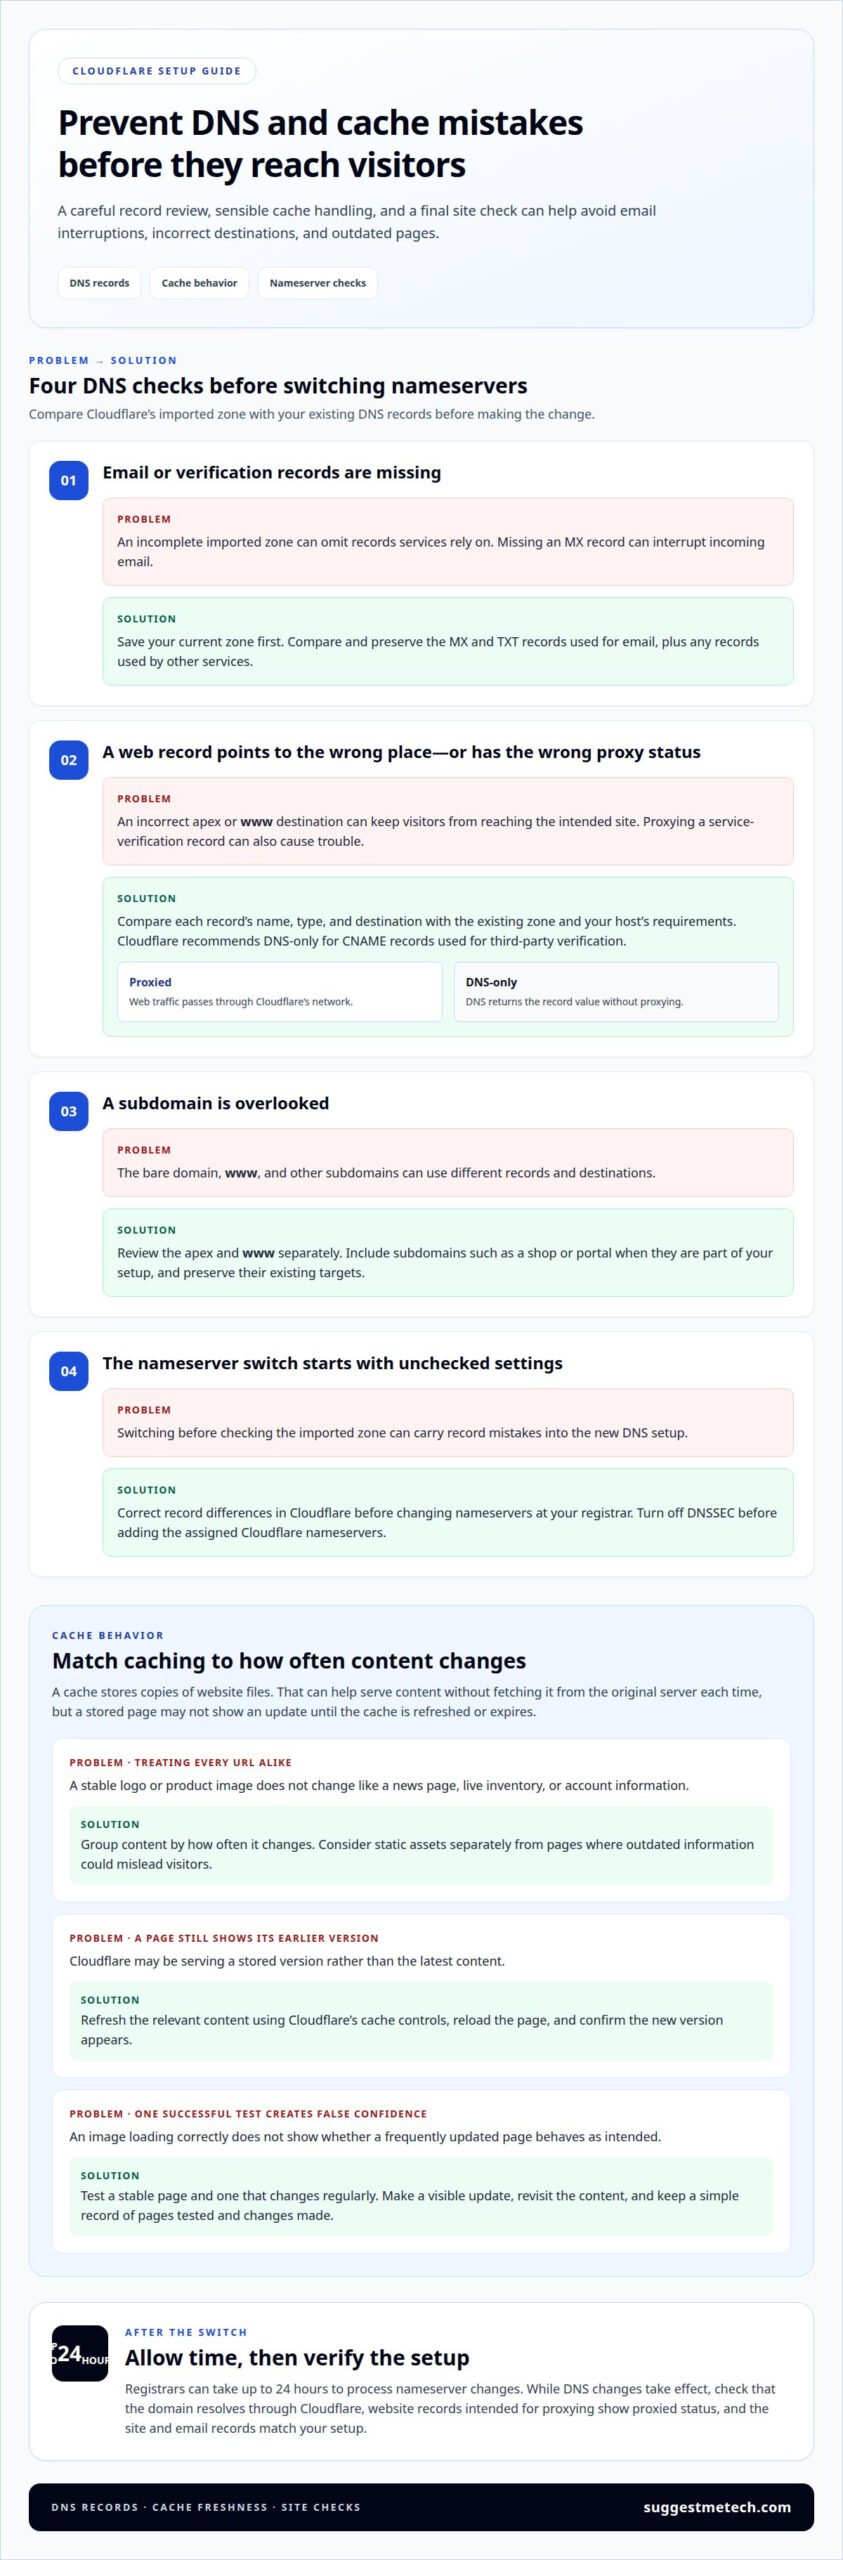
For each web record, decide whether Cloudflare should proxy traffic or return its DNS value directly. A proxied record sends web traffic through Cloudflare’s network; a DNS-only record returns the record value without proxying. Cloudflare recommends DNS-only for CNAME records used to verify a domain with a third-party service. After activation, check that website records intended for proxying show proxied status.
-
Check Subdomain and WWW Records
Review the www record and every subdomain your visitors or services use. The apex record serves the bare domain, while a www record lets visitors reach the site with “www” before the domain. Compare each name and destination with the current DNS zone. Include subdomains such as a shop or portal only if they’re part of your setup, and preserve their existing targets.
-
Verify Records Before Switching Nameservers
Compare Cloudflare’s imported zone with your saved records before changing nameservers. Confirm the apex and www destinations, MX and TXT entries, and any service-verification CNAMEs. Common errors include a missing email record, an incorrect website destination, or proxying a verification record. Correct any mistakes in Cloudflare before switching. Then update nameservers at your registrar to the assigned Cloudflare values. Turn off DNSSEC before adding those nameservers.
To verify records, compare each name, type, and content with the current provider’s zone. Cloudflare offers free and paid plans, with pricing and features depending on the selected plan. Choose during onboarding based on the options your site needs.
Use the saved zone as a reference while reviewing imported entries. For the domain’s apex, confirm the record that makes the domain accessible to visitors, then compare its type and content with what your website or application host requires. The host determines the required record type and content. Review the www subdomain separately, since its DNS record helps visitors reach your site or application when they enter www before the domain.
Give email records their own final review rather than assuming website records are enough. When moving DNS management to Cloudflare, copy the existing email-related DNS records, including MX and TXT records, correctly to avoid delivery interruptions. After adding a domain to Cloudflare, check the email and MX records again, as the forum reply recommends. Compare these entries with the records in the existing zone so that any differences are visible and can be addressed before relying on the new DNS setup.
Caching website content
A cache stores copies of website files so they can be served without fetching them from the original server each time. If you’re learning how to set up Cloudflare for your website, match cache behavior to how often each page or file changes. Refresh the cache when visitors need to see an update right away.
- Separate stable files from frequently updated pages. List your site content and group it by how often it changes. A logo or product photograph may remain the same for weeks, while a news page or inventory listing can change often. This distinction helps you decide what to cache and where fresh content matters. Avoid treating every URL alike: a product image and its changing stock details serve different purposes.
- Review Cloudflare’s caching behavior for each content type. Open Cloudflare’s caching controls and consider how a cached response affects each page or file. Static assets, such as a site logo, are often suitable because visitors can reuse the stored copy. Pages with changing account information or live inventory need more care. Avoid broad cache rules for pages where outdated information could mislead visitors.
- Test a representative page after changing cache settings. Choose a stable page and one that changes regularly. Load each in a browser, make a visible update on the website, then revisit the affected content. This helps reveal whether Cloudflare is serving a stored version or retrieving the latest one. Test different content types: an image loading correctly doesn’t show whether a frequently updated page behaves as intended.
- Refresh cached content after important edits. Cloudflare caching can delay website updates until the cache is refreshed or expires. If a changed banner or page still displays its earlier version, refresh the relevant content using Cloudflare’s cache controls. Then reload the page and confirm the new version appears. For routine edits, account for caching in your publishing workflow, especially when visitors need current details.
Keep a simple record of the pages you test and the changes you make. This helps identify which cache setting affects an outdated page. As you refine those settings, SuggestMeTech’s Cloudflare and performance guides can help you explore related website performance considerations.
Configuring security and performance settings
Set security and performance options after Cloudflare is active, then test key pages. Cloudflare distributes website data across servers worldwide, helping visitors connect to a nearby data source and potentially reducing load times.
- Review SSL/TLS settings after changing nameservers. SSL/TLS settings control how connections between visitors, Cloudflare, and your website’s origin server are protected. Check that the website’s certificate and Cloudflare’s connection settings support secure HTTPS access. If the origin server also uses a certificate, confirm it remains valid and matches the domain. Then load the homepage and a sign-in page using HTTPS, and watch for browser security warnings.
- Check the connection from Cloudflare to your origin. A visitor’s browser connects to Cloudflare, which then connects to the server hosting the website. Review the selected SSL/TLS mode against the origin server’s certificate and encryption setup. For example, if the origin server has a valid certificate, make sure the configured mode expects a secure connection. Test more than the homepage: a login page can reveal issues that a public landing page may not show.
- Confirm the website records use the intended proxy setting. In Cloudflare’s DNS settings, review the records that route web traffic. Proxied traffic passes through Cloudflare’s network, while DNS-only records return their DNS values without proxying. Keep service-verification records DNS-only where required, and avoid changing records unrelated to website traffic. Test the main domain and a frequently used subdomain separately, since each may serve a different purpose.
- Test performance using real pages and files. Cloudflare’s distributed network lets visitors connect to a nearby data source rather than always relying on the origin server. Check representative pages, including an image-heavy page and a plain-text page. Compare how each loads before and after your configuration changes. If one page slows down or behaves differently, review its DNS proxy and caching settings before adjusting site-wide options.
- Make one change at a time and retest. Keep a brief record of each Cloudflare setting you change, the affected page, and the result. For example, adjust a security setting, then test the homepage, login page, and a form before making another change. This makes it easier to identify the setting behind a browser error or unexpected behavior. Recheck HTTPS after any later certificate or origin-server change.
After changing nameservers, review your SSL/TLS certificates to help prevent insecure connections and browser errors. Make this part of your HTTPS check rather than assuming earlier certificate settings still provide the expected result. Load important pages over HTTPS and note any warning or failure before moving on.
If a warning appears, pause further configuration changes and inspect the certificate and connection settings before retesting. Once the pages load without warnings, keep the certificate review alongside your record of Cloudflare settings, so you can compare later changes with a known result. Repeat the review whenever nameservers or certificate settings change, and confirm the site still opens securely from a visitor’s perspective.
DNS propagation
DNS propagation is the process of updated domain information becoming available across DNS resolvers. After a nameserver change, registrars can take up to 24 hours to process it.
To test whether Cloudflare is working, check the domain’s activation status and DNS answers, then load the site using HTTPS. Test the apex domain and www address separately to catch record-specific problems.
- Record when you changed the nameservers. After replacing the domain’s existing nameservers with Cloudflare’s assigned values, note when you saved the change. This gives you a reference for later checks. Registrars can take up to 24 hours to process nameserver changes, so different results shortly after the update can reflect processing rather than a typo. Keep the registrar and Cloudflare dashboard available while testing.
- Check the domain’s status in Cloudflare. Open the domain dashboard and review its activation status. If Cloudflare hasn’t detected the change, compare the assigned nameservers with the values saved at your registrar. A mistyped or incomplete value can stop the domain from using Cloudflare’s DNS. Correct any mismatch, save the registrar change, and check the dashboard again.
- Compare DNS answers for the apex and www address. Test the bare domain and its www version separately, since visitors may use either address. Compare each result with the corresponding record in Cloudflare and the expected website destination. If the apex resolves but www doesn’t, inspect the www record rather than changing unrelated settings. Repeat the comparison after the registrar processes the nameserver update.
- Load the website and identify where a failure occurs. Open the homepage over HTTPS, then try a representative page or subdomain. If one address works and another fails, compare their DNS records and proxy status in Cloudflare. If both fail, review nameserver configuration and activation status. A browser security warning differs from a DNS resolution error, so note the exact message before making changes.
- Repeat the same tests after correcting a setting. Use consistent domain names and pages for each follow-up check, including the apex, www, and any key subdomain. Record which address fails and what Cloudflare reports. This makes changes easier to track and helps distinguish propagation from a record mismatch. Completing how to set up Cloudflare for your website means testing each address, not just the homepage.
Once the site resolves and loads securely, test email separately if the domain also handles email.
How do I add a website to Cloudflare and choose a plan?
Cloudflare onboarding starts with your website’s apex domain, DNS record setup, and plan selection. Follow the sequence below, using the domain and features your site actually needs.
- Enter the apex domain. Start Cloudflare’s onboarding by entering the bare domain, without a page path or subdomain. For example, use example.com, not www.example.com/about. The apex domain identifies the website’s main DNS zone. Check the spelling before continuing, since a typo could start setup for a different domain.
- Choose how to add DNS records. Cloudflare asks how to add the domain’s DNS records during onboarding. Review the records it finds against the existing DNS zone before relying on the import. Confirm the website’s apex and www records, plus records used for email or verification. If you manage records manually, compare each name, type, and destination with the current provider’s entries.
- Select a plan by matching features to your needs. Cloudflare offers free and paid plans, but prices and included features vary. Review the current options in the onboarding flow and choose based on the specific features your website needs. A basic informational site may have different requirements from a store or membership site. Don’t select a higher tier simply because the site receives visitors; prioritize relevant capabilities.
- Review the selected plan before continuing. Check the plan name and listed features in Cloudflare before confirming. Focus on the capabilities you expect to use, such as security or performance controls relevant to your site. If you’re comparing free and paid options, assess each against the same needs. For example, confirm whether a required feature appears in the plan you’re considering rather than assuming all tiers include it.
- Complete setup in the right order. After selecting a plan and adding DNS records, follow Cloudflare’s activation steps. Full DNS setup usually requires entering the domain’s assigned Cloudflare nameservers at the registrar. Keep access to both Cloudflare and the registrar available, and use the assigned values shown for your domain. Then check activation status and test the website once the nameserver change has taken effect.
Use SuggestMeTech’s technology guides to compare website tools and make a plan choice that fits your setup.
SuggestMeTech: Technology Reviews and Guides
SuggestMeTech’s Technology Reviews and Guides help readers compare technology services and understand which features fit their needs. After configuring Cloudflare, use these guides when weighing website tools, reviewing hosting options, or deciding which performance and security features matter for your site. The goal is to make technical choices easier to assess, not to replace your own configuration work.
If you’re comparing services for a new website or refining your setup, explore relevant technology coverage and use its criteria to guide your next decision. Visit suggestmetech.com to explore SuggestMeTech’s technology reviews and guides.
Keep your website setup aligned with its next changes
A website’s needs can shift as you add pages, services, or tools. Treat your Cloudflare configuration as part of that change process: revisit relevant settings when your site structure or connected services change. This helps keep future updates intentional instead of relying on old assumptions.
Knowing how to set up Cloudflare for your website gives you a foundation for making those decisions. SuggestMeTech’s Technology Reviews and Guides can help you assess technology choices, while its Advertising Space is relevant to organizations looking to promote their offerings on the publication.
Have a question or feedback about the guide? Contact SuggestMeTech and share what would make your next technology decision clearer. Keep learning, make changes deliberately, and build a setup that serves your website’s needs.