

Does the thought of configuring DNS records and choosing between a domain registrar and an email host make you hesitate? You’re not alone. The process of moving from a generic inbox to a custom domain email can feel overwhelming, especially with the risk of losing important messages during the switch. But knowing how to set up a professional email address is a critical step in building trust and establishing your brand’s identity, and it’s more straightforward than you might think.
This comprehensive guide cuts through the technical jargon to provide a clear, step-by-step roadmap. We will walk you through the entire process, from registering your domain to configuring your inbox and migrating existing emails without any data loss. By the end, you will have a fully functional you@yourcompany.com address, a clear understanding of the costs involved, and the confidence to manage your professional digital identity effectively.
Key Takeaways
- Discover strategies for choosing and registering a domain name that builds instant brand authority and client trust.
- Learn the key criteria for selecting a reliable email hosting provider, from security features to mobile app quality.
- Master the technical steps for how to set up a professional email address, including the critical DNS configuration that links your domain to your inbox.
- Go beyond the technical setup by properly configuring your new email on clients like Outlook or Gmail for a seamless, professional user experience.
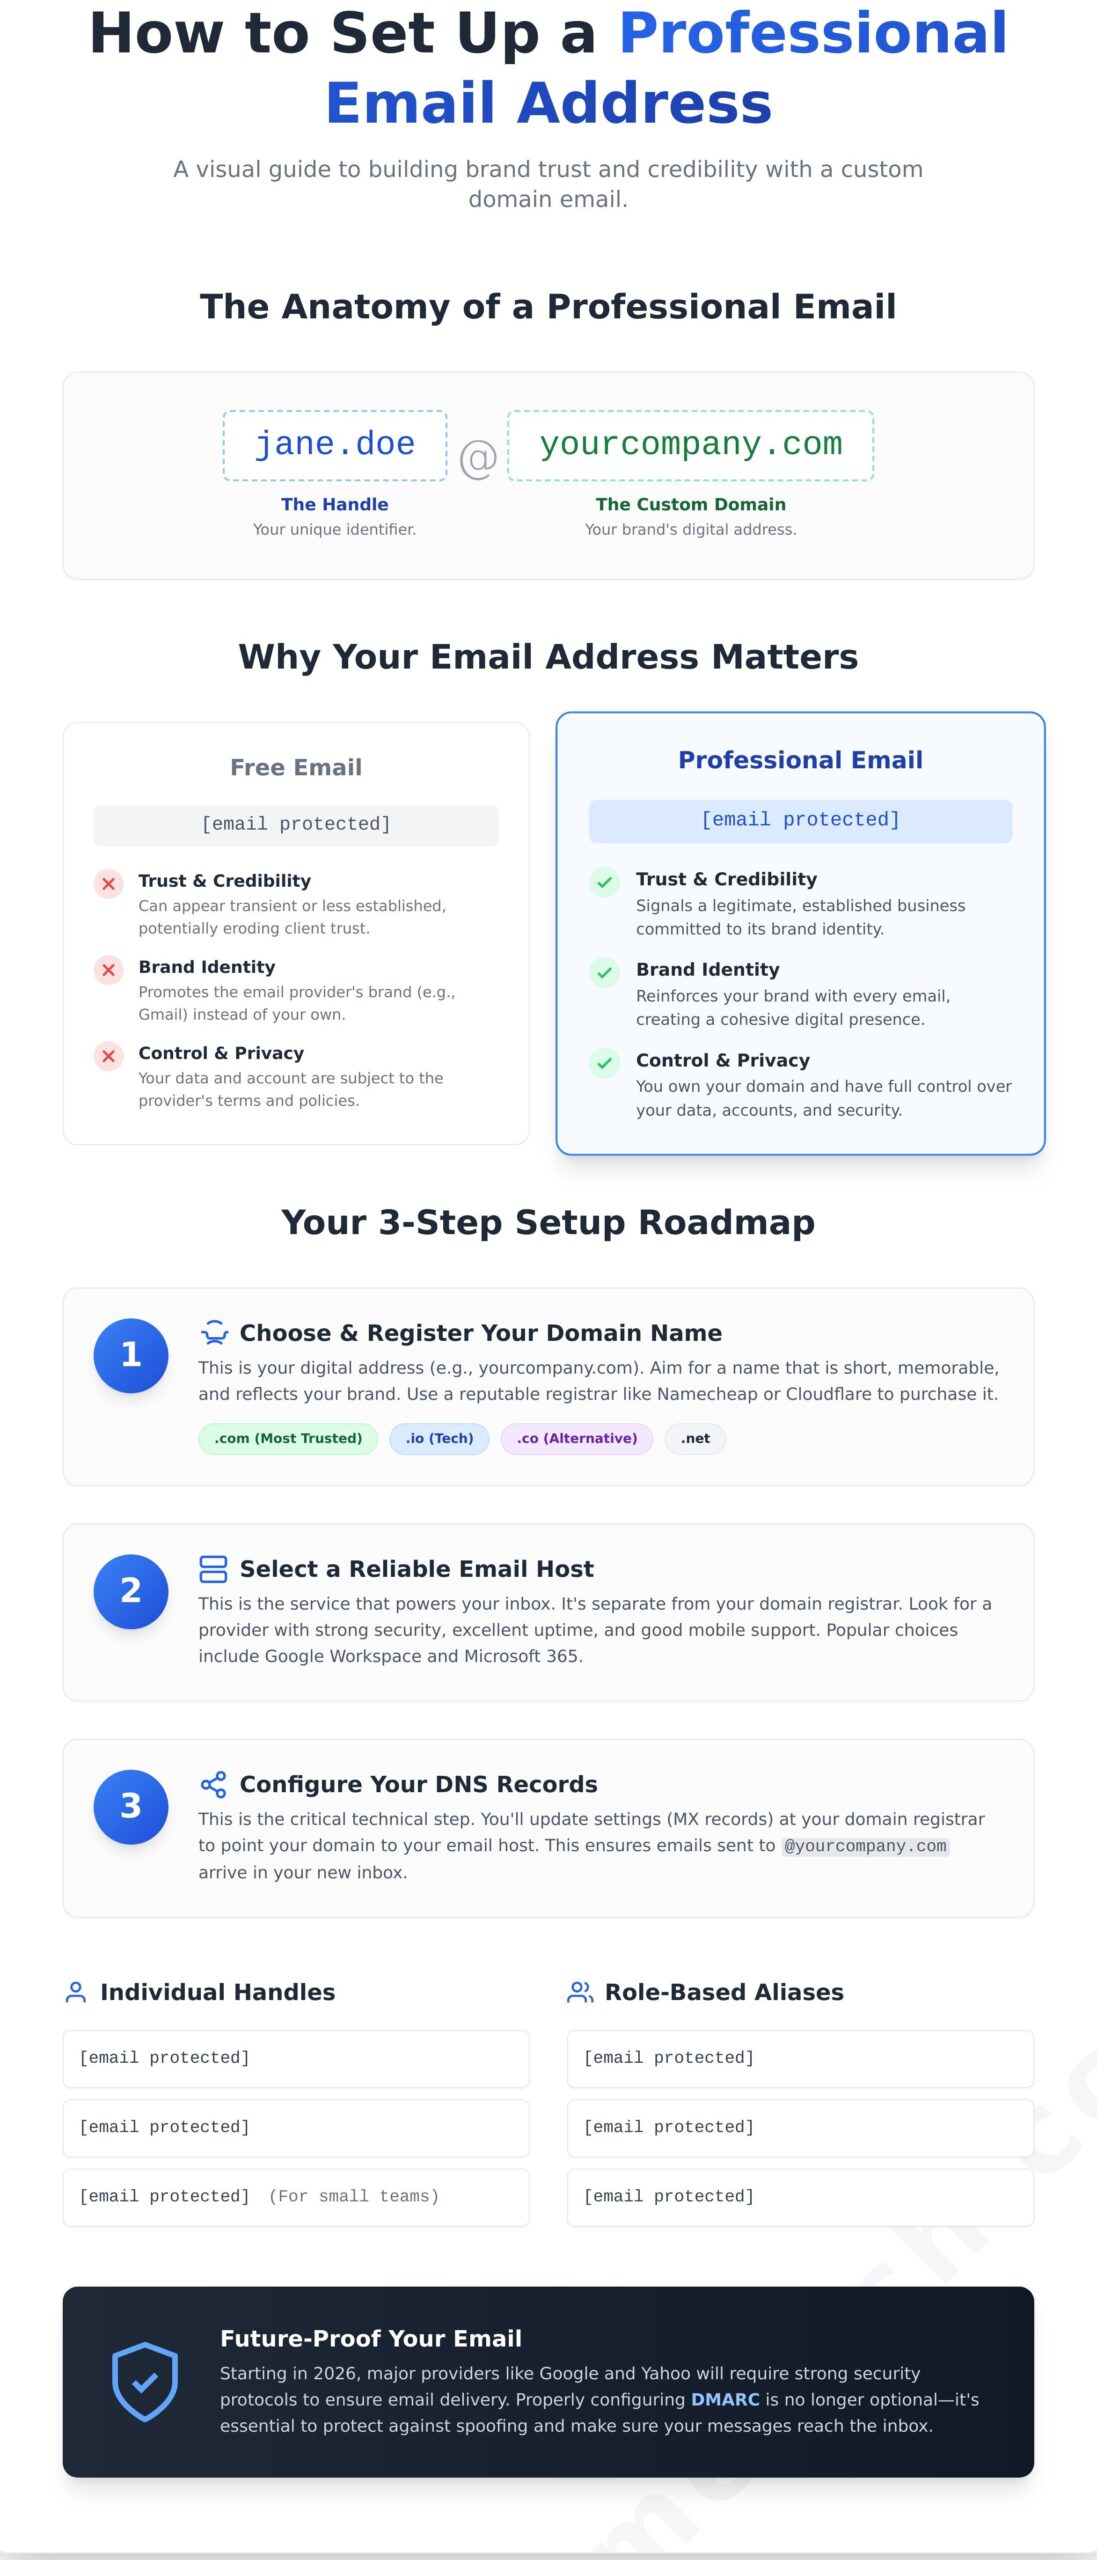
Understanding the Anatomy of a Professional Email Address
Before diving into the technical steps of how to set up a professional email address, it’s crucial to understand what makes an email “professional.” It isn’t just about the name before the “@” symbol; it’s about what comes after. A professional email address uses a custom domain you own, like contact@yourbrand.com, instead of a generic one from a free provider.
This structure immediately signals credibility and permanence to anyone you contact. While the fundamental Anatomy of an Email Address remains the same-a local-part and a domain-using your own domain transforms it from a personal identifier into a legitimate business asset. It’s the first step in building a trustworthy digital identity.
The Difference Between @gmail.com and Custom Domains
While a free email address from Gmail or Outlook is functional, it sends an unintentional message to clients and partners. An address like janesbakery2024@gmail.com can suggest a business that is either brand new or not fully established, potentially eroding trust before a conversation even begins.
The key differences come down to ownership, perception, and control:
- Ownership & Privacy: With a free account, your data is subject to the provider’s terms of service. When you pay for professional email hosting, you own the domain and have full control over your accounts and data privacy.
- Permanence: A custom domain shows you are invested in your brand for the long term. Free accounts can appear transient, which may deter potential partners looking for stability.
- Features & Support: Paid email services typically offer superior storage, dedicated customer support, and advanced security features that are unavailable with standard free accounts.
Why Credibility Starts with Your Digital Identity
Your email address is often the first point of contact a potential customer has with your business. Studies consistently show that consumers are significantly more likely to trust and engage with a business that uses a custom email domain. It reinforces your brand identity, creating a cohesive experience alongside your website and social media profiles.
A professional email address is a digital handshake that verifies your business identity and establishes your commitment to security and legitimacy.
Looking ahead, the definition of a professional email is evolving. By 2026, standards from major providers like Google and Yahoo will require more than just a custom name. Proper setup will mandate strong security protocols like DMARC (Domain-based Message Authentication, Reporting, and Conformance) to protect against spoofing and ensure your messages reach the inbox, a topic we’ll explore later in this guide.
Choosing and Registering the Right Domain Name
Your domain name is the foundation of your professional email infrastructure. It’s the part that comes after the “@” symbol-like @yourcompany.com-and serves as your digital address, reinforcing your brand with every message you send.
When selecting your domain, aim for a name that is short, memorable, and directly related to your business. It should be easy to spell and pronounce to avoid lost emails and customer confusion. This is a critical first step in learning how to set up a professional email address that inspires confidence.
Your choice of a Top-Level Domain (TLD), the extension like .com or .net, also matters. While .com is the most recognized and trusted TLD for businesses, other options like .io (for tech) or .co can be effective alternatives if your first choice is taken. To check availability safely and avoid domain squatting, use the search tool on a reputable registrar’s site directly.
Best Practices for Professional Handles
The “handle” is the part of your email before the “@” symbol. Establishing a consistent format across your organization looks professional and makes it easy for clients to contact team members. Common professional email address formats include:
- First Name + Last Name: jane.doe@yourcompany.com
- First Initial + Last Name: jdoe@yourcompany.com
- First Name Only: jane@yourcompany.com (best for smaller teams)
For general inquiries, use role-based aliases like hello@, support@, or sales@. These appear more official and can be routed to a team or specific person. Always avoid using unprofessional nicknames, numbers, or unnecessary hyphens in your primary address.
Where to Buy and Manage Your Domain
You can purchase a domain from companies called domain registrars. Reputable options include Namecheap, Cloudflare, and Squarespace, which recently acquired Google Domains. Each offers a straightforward process for searching and buying your desired name. For a detailed comparison, see our guide on How to Choose and Register a Domain Name.
When you register, always enable “Domain Privacy Protection.” This service hides your personal contact information from the public WHOIS database, a common source for spammers and identity thieves. Most top registrars now include this for free or for a small annual fee, and it’s an essential security measure.
Selecting a Reliable Email Hosting Provider
Once you have your domain name, the next critical decision is where to host your email. Many people assume the company that sold them their domain must also manage their email, but these are separate services. Choosing the right provider is a core step in how to set up a professional email address that is reliable and secure.
When evaluating providers, focus on these four key criteria:
- Uptime: Your email must always be accessible. Look for providers that guarantee at least 99.9% uptime, as anything less can lead to missed opportunities.
- Security: Non-negotiable features include two-factor authentication (2FA), advanced spam and phishing protection, and end-to-end encryption.
- Mobile Apps: A high-quality, intuitive mobile app is essential for managing communications on the go. Test the user experience before committing.
- Cost: Compare plans based on storage per user, included applications, and the ability to scale your account as your team grows.
Increasingly, businesses in 2026 are choosing integrated productivity suites over standalone email. These platforms bundle professional email with cloud storage, video conferencing, and collaborative document editing, streamlining your workflow and simplifying billing.
Google Workspace vs. Microsoft 365
Google Workspace is an excellent choice for cloud-native teams and anyone comfortable with the clean, fast Gmail interface. Its strengths lie in real-time collaboration through Google Docs, Sheets, and Drive. It is built for agility and remote work.
Microsoft 365 is often the standard in traditional corporate environments. It is ideal for businesses that rely heavily on the powerful desktop versions of Word, Excel, and PowerPoint, with deep integration into the Windows ecosystem via Outlook and Teams.
For freelancers, the entry-level tiers of both platforms offer immense value. For a few dollars a month, you get a trusted email address plus a full suite of professional tools that enhance your brand credibility far more than a free email account ever could.
Using Email Bundles from Web Hosting Providers
Many of the Best Web Hosting Providers of 2026 offer convenient all-in-one packages that include a “free” professional email account with your hosting plan. This is a simple starting point for those on a tight budget.
However, separating your email from your web host is a smart security practice. If your website is ever compromised, a separate email host ensures your critical communications remain secure and accessible. Dedicated email providers also typically offer superior spam filtering and clearer documentation for the required technical DNS and MX record setup.
Step-by-Step Technical Configuration and DNS Setup
This is where we connect the two services you’ve chosen: your domain registrar and your email host. Think of this step as building the digital bridge that allows mail to flow to your new address. Before you begin, have your login credentials ready for both your domain registrar (like Namecheap or GoDaddy) and your email provider (like Google Workspace or Microsoft 365).
The core of this process involves updating your Domain Name System (DNS) records. These records are the internet’s address book, and we need to add a few new entries to direct your email traffic correctly. This is the most technical part of learning how to set up a professional email address, but following the steps carefully makes it manageable.
Configuring MX Records and DNS Settings
The most critical records for email are the MX (Mail Exchanger) records. Think of them as the specific address labels for your domain’s mail. These records tell the internet’s mail delivery system exactly which server is responsible for receiving email for your domain, ensuring messages sent to you@yourdomain.com arrive at your new inbox.
Your email host will provide the exact values you need to enter. The first step is usually to verify you own the domain by adding a TXT record:
- Log in to your domain registrar’s control panel and navigate to the DNS management section.
- Your email host will give you a unique verification code (usually a TXT record).
- Create a new TXT record, copying and pasting the value provided by your host.
- Once verified, you will add the MX records, also provided by your email host. Delete any old MX records to avoid conflicts.
Implementing Security Protocols: SPF, DKIM, and DMARC
To ensure your emails are delivered reliably and securely, you must add a few more DNS records. These protocols build trust with other email servers and are essential for modern email deliverability.
SPF (Sender Policy Framework) is a TXT record that lists the servers authorized to send email on behalf of your domain, preventing spammers from spoofing your address. DKIM (DomainKeys Identified Mail) adds a unique digital signature to every email, proving it genuinely came from you and wasn’t altered in transit.
Finally, DMARC (Domain-based Message Authentication, Reporting, and Conformance) builds on SPF and DKIM. It tells receiving mail servers what to do with messages that fail these checks. Starting in 2026, a DMARC policy will be required by major providers like Google and Yahoo to prevent your emails from being marked as spam.
Once you save these changes, they need to propagate across the internet, which can take up to 48 hours. The best way to test if your setup is complete is to send a test email from another account to your new professional address, and then reply from your new address to confirm it can both send and receive.
Finalizing Your Setup for Professional Standards
With the technical foundation in place, the final steps focus on refining the user experience and securing your new professional identity. This involves configuring your email for daily use, implementing best practices for branding, and ensuring a smooth transition from any previous accounts.
Before you do anything else, enable multi-factor authentication (MFA). MFA adds a crucial second layer of security, typically requiring a code from your phone to log in. This simple action is one of the most effective ways to protect your professional account from unauthorized access.
Creating a Standardized Email Signature
Your email signature is your digital business card. A consistent, professional signature reinforces your brand with every message, providing key contact information at a glance and making it easy for recipients to get in touch.
Essential elements for a clean signature include:
- Your Full Name
- Your Title (e.g., Founder, Marketing Manager)
- Company Name
- A link to your website
- Your professional phone number
Keep the design simple and mobile-friendly. Avoid large image files or complex formatting that can load slowly or appear broken on different devices. For more guidance on professional messaging, review our guide on Email Etiquette: 10 Rules for Professional Communication.
Setting Up Aliases and Forwarding
Email aliases let you create variations of your primary address, like info@yourdomain.com or sales@yourdomain.com, that all deliver to your main inbox. This is a cost-effective way to manage different business functions without paying for extra user accounts.
To ensure a seamless transition, set up a temporary forward from your old personal email address. This simple step in how to set up a professional email address catches any messages still being sent to your old account, giving you time to update your contacts without missing critical communications. If your host offers a “catch-all” address, use it with caution, as it can attract a significant amount of spam.
Finalizing Your Professional Identity
You now have a complete roadmap for how to set up a professional email address. The process comes down to a few key actions: securing a unique domain name, selecting a reliable hosting provider, and correctly configuring your records. While some steps are technical, they are entirely manageable with a clear guide.
Your most critical decision is choosing a provider that guarantees security and reliability. To make this step easier, we’ve already compared the top options on the market.
Ready to take the next step? Explore our top-rated web hosting providers to get your professional email started today. Our list features Editor’s Picks backed by verified uptime and support testing, plus community-vetted recommendations perfect for small businesses.
This is a powerful investment in your brand’s credibility. You are now equipped to communicate with the confidence and authority you’ve worked hard to build.
Frequently Asked Questions About Professional Email
Do I have to pay for a professional email address or are there free options?
While some web hosts bundle a “free” email account with their plans, a truly professional email requires a custom domain name (e.g., yourbusiness.com), which has an annual fee. The email hosting itself may be included with your web hosting or purchased separately through services like Google Workspace or Microsoft 365. These dedicated services offer better reliability and security but come with a monthly subscription cost.
Can I use a professional email address with my existing personal Gmail account?
Yes, you can manage your professional email from your personal Gmail interface. After setting up your address with a provider, you can configure Gmail to both receive messages via forwarding and send messages using your professional address as the “From” identity. This allows you to keep your familiar workflow while still presenting a professional brand image to your clients and contacts. It combines convenience with credibility.
How long does it take for a new professional email address to start working?
Typically, a new email address will start working within a few hours. The process depends on DNS propagation, which is how internet servers update with your new settings (specifically MX records for mail). While it’s often quick, this process can sometimes take up to 48 hours to complete globally. It’s best to wait a day before relying on it for critical communications to ensure all systems have updated.
What happens to my professional email if I decide to change my web hosting provider?
Your email’s fate depends on where it’s hosted. If your email is with a third-party provider like Google Workspace, you simply update your domain’s MX records after you move your site. If your email was hosted with your old web host, you will need to migrate your emails to your new provider. We recommend using a separate, dedicated email provider to make changing web hosts much simpler.
Is it possible to have a professional email address without having a website?
Absolutely. A professional email address is tied to a domain name, not a website. You can purchase a domain from a registrar and then sign up for an email hosting service without ever building a site. This is a great first step for establishing your brand’s identity and credibility, even if you are not yet ready to launch a full website. The process of how to set up a professional email address remains the same.
How many professional email addresses do I need for a one-person business?
For a solo operation, starting with two or three addresses is a practical approach. You should have a primary address (e.g., yourname@yourdomain.com) for direct contact. It’s also wise to create aliases like info@yourdomain.com for general inquiries and support@yourdomain.com for customer service. This helps organize your inbox and makes your business appear more established and structured from day one.
Can I change my professional email handle after I have already set it up?
You cannot directly edit an email handle (the part before the “@” symbol) once it has been created. However, you can achieve a similar result by creating a new email address with your desired handle. You can then forward all mail from the old address to the new one and inform your contacts of the change. After a transition period, you can safely delete the old address if it’s no longer needed.
Why are my emails from a new professional address going to the recipient’s spam folder?
Emails from a new domain often land in spam because the address has no sending reputation. To fix this, you must authenticate your domain by setting up SPF, DKIM, and DMARC records. These are special DNS settings that prove your emails are legitimate. It is also important to “warm up” your account by sending a small number of emails to trusted contacts first to build a positive history with email providers.