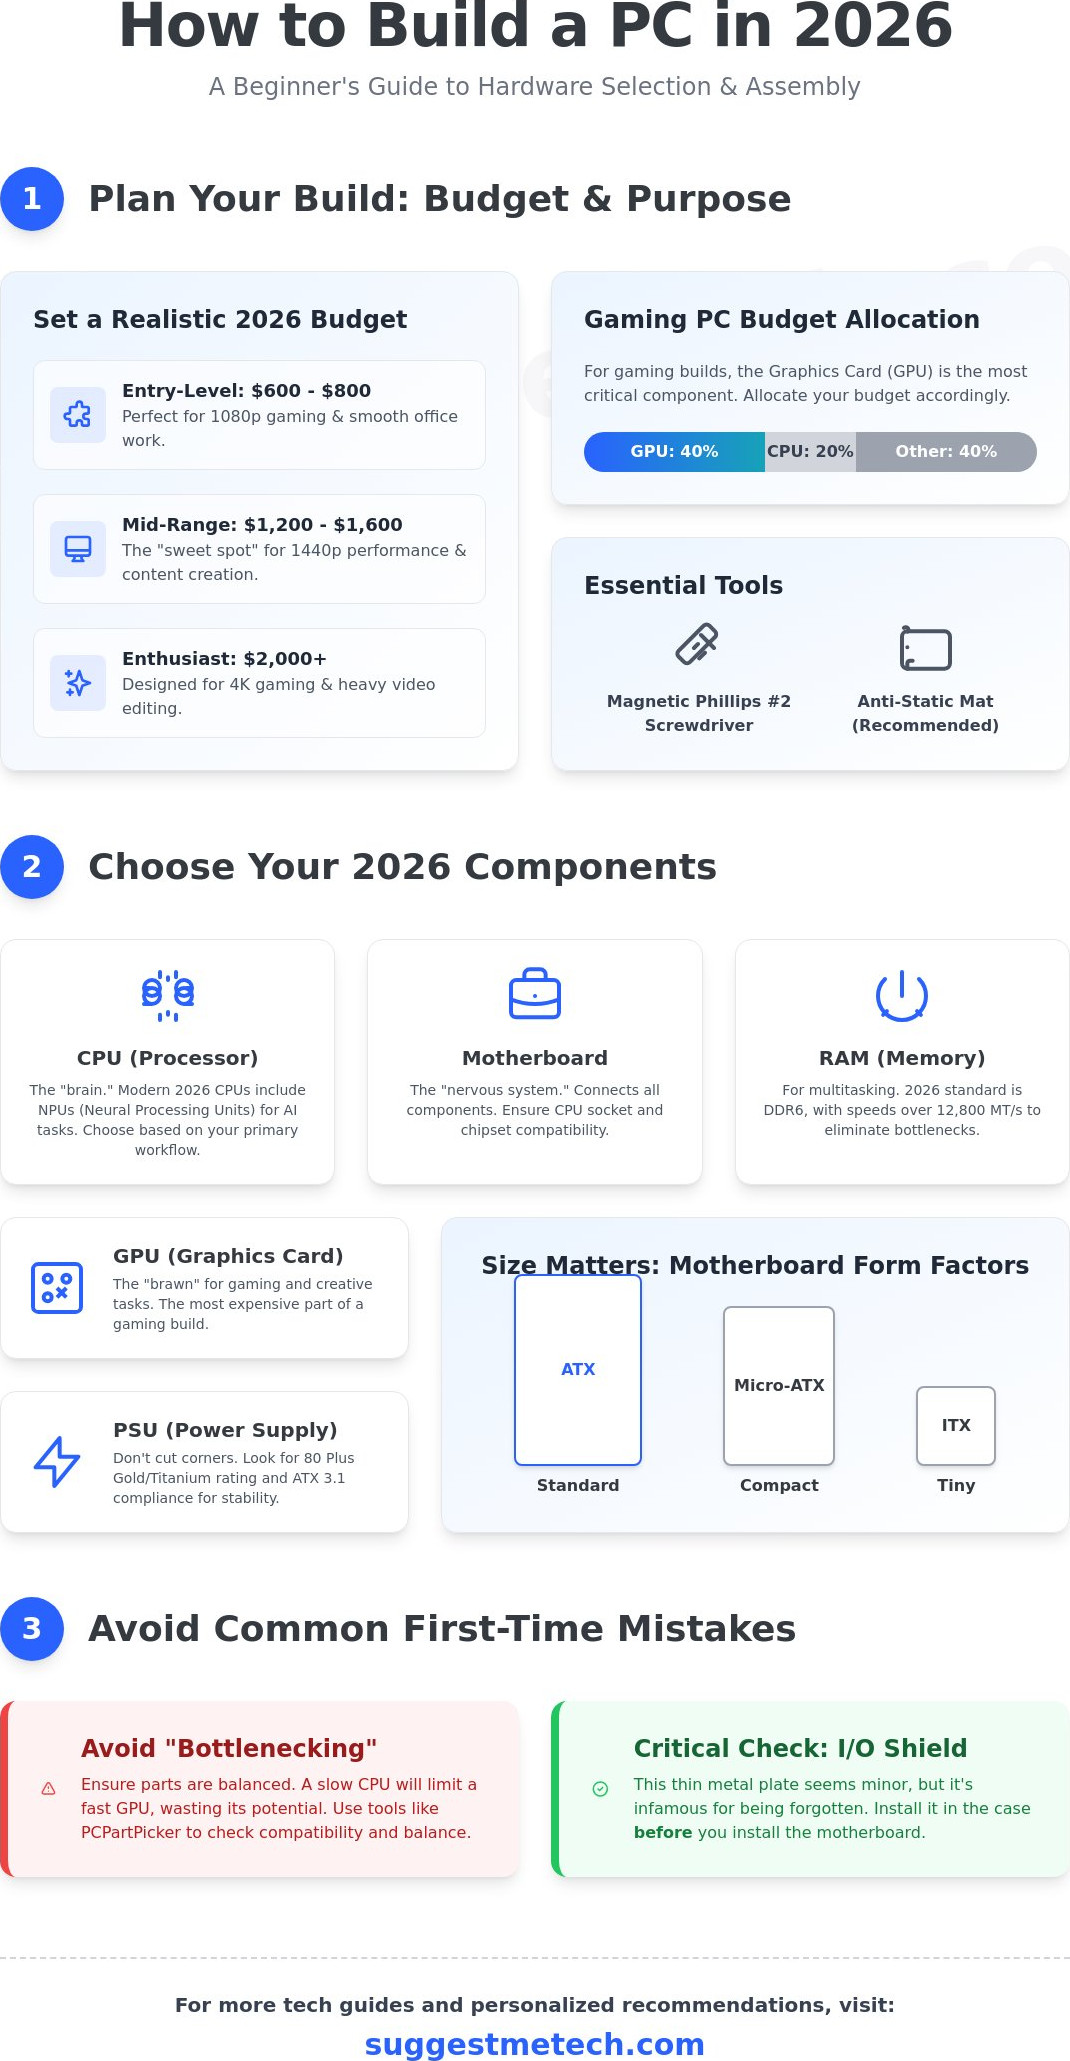
You don’t need an advanced degree to build a machine that outperforms a $2,000 pre-built desktop for 25% less money. It’s completely normal to feel a spark of anxiety when you look at a pile of expensive components, which is why this how to build a pc for beginners guide focuses on clarity over complexity. You probably worry about static electricity damaging a motherboard or spending hours on a build only to have it fail during the first boot. We understand that confusion over component compatibility is the primary reason many users hesitate to start their DIY journey.
We promise to take you from a box of parts to a fully functional, high-performance desktop using clear instructions that skip the technical jargon. This article provides a comprehensive walkthrough of the 2026 hardware landscape, covering everything from seating your CPU to the final BIOS configuration. You’ll gain the confidence to assemble a custom rig that is powerful, personalized, and perfectly within your budget.
Key Takeaways
- Learn how to tailor your custom build for gaming, business, or school to ensure you get the best performance for your specific budget and needs.
- Discover the essential 2026 components, including why Neural Processing Units (NPUs) are now a must-have for modern AI-driven tasks and future-proofing.
- Follow our how to build a pc for beginners guide to safely install your CPU and RAM while avoiding common assembly mistakes that trip up most novices.
- Master the first boot process, from navigating the BIOS for the first time to installing the latest 2026 operating system via a bootable USB drive.
- Identify critical setup errors, such as the infamous I/O shield oversight, to ensure your high-performance rig is functional and ready for long-term use.
Planning Your PC Build: Budget, Purpose, and Compatibility
Building a custom PC means you choose every part yourself. Unlike a pre-built machine from a big box store, a custom rig uses higher-quality essential components that offer better longevity and easier repair paths. You avoid the “bloatware” software that typically slows down retail PCs from day one. This how to build a pc for beginners guide starts with a clear goal. You must decide if your machine is for high-end gaming, professional business applications, or school assignments.
Gaming builds require a powerful graphics card (GPU), while a business or school PC might prioritize a fast processor (CPU) and plenty of memory (RAM) for multitasking. Beginners often worry about “bottlenecking” during the planning phase. Think of it like a literal bottleneck; if your CPU is slow but your GPU is incredibly fast, the CPU limits the overall speed of the system. You want balanced parts so no single component holds the others back from their full potential.
Before buying parts, gather your tools. You don’t need a professional workshop. A long-neck magnetic Phillips #2 screwdriver is the most important tool you’ll own. The magnet keeps tiny screws from falling into dark corners of the case. An anti-static mat is also recommended to protect sensitive electronics from static discharge, especially if you’re working in a carpeted room.
Setting a Realistic 2026 Budget
Budgeting in 2026 requires a strategic approach. While component prices stabilized in early 2026 following the supply chain corrections of 2025, high-end hardware still demands a premium. Use these three tiers to plan your spending:
- Entry-Level ($600 – $800): Perfect for 1080p gaming and smooth office work.
- Mid-Range ($1,200 – $1,600): The “sweet spot” for 1440p performance and content creation.
- Enthusiast ($2,000+): Designed for 4K gaming and heavy video editing.
Allocate about 40% of your total budget to the GPU if gaming is your priority. You can save money by choosing a functional case without expensive RGB lighting or by using the stock cooler that comes with many mid-range CPUs. Avoid overspending on “future-proofing” parts that offer diminishing returns.
Ensuring Part Compatibility
Parts must fit together both physically and electronically. Use tools like PCPartPicker to verify that your CPU matches the motherboard socket and chipset. You also need to select a form factor, which determines the size of your build. ATX is the standard large size; Micro-ATX is a compact middle ground; ITX is for tiny, specialized builds that require careful cable management. If you realize that a stationary desktop doesn’t fit your lifestyle, compare these specs against The Best Laptops of 2026 to see if a mobile workstation is a better fit for your needs.
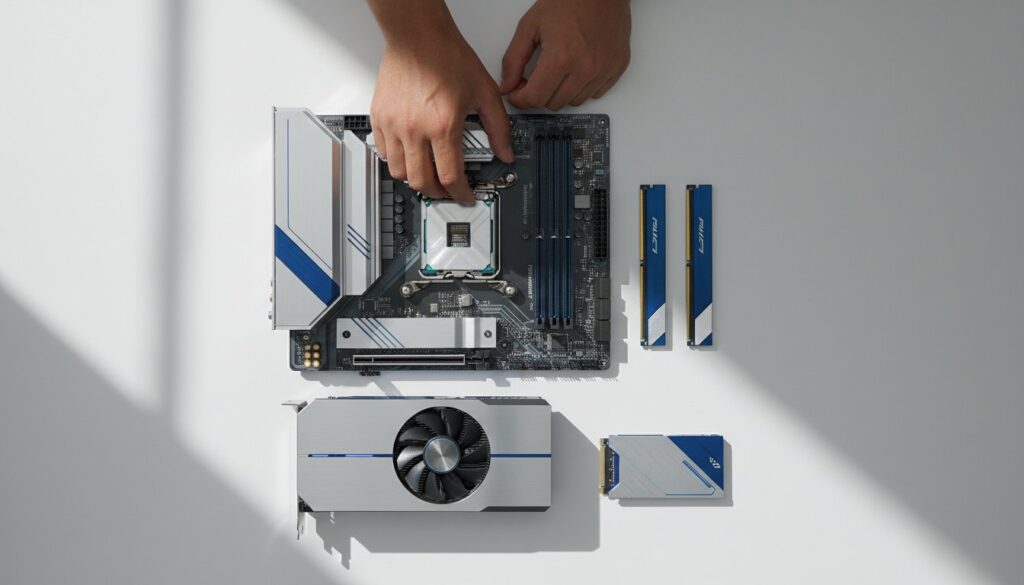
The 2026 Parts List: Choosing Your Essential Components
Your hardware choices determine how your system handles everything from gaming to generative AI. In 2026, the traditional hierarchy of the Central Processing Unit (CPU) as the “brain” and the Graphics Processing Unit (GPU) as the “brawn” has evolved. You now need to consider the Neural Processing Unit (NPU), a dedicated chip for AI tasks that is now standard in modern processors. This how to build a pc for beginners guide focuses on future-proofing your rig with the latest standards to ensure your investment lasts for years.
Reliability starts with your Power Supply Unit (PSU). Don’t cut corners here. Look for an 80 Plus Gold or Titanium rating to ensure at least 90% energy efficiency at typical loads. A stable PSU protects your expensive components from power surges and reduces heat waste, which is vital for long-term durability. Modern 2026 builds often require ATX 3.1 compliant power supplies to handle the transient power spikes of high-end graphics cards.
The Core Trio: CPU, Motherboard, and RAM
Choosing between Intel and AMD in 2026 depends on your specific workflow. Intel’s latest architecture prioritizes hybrid core efficiency for multitasking, while AMD continues to lead in raw gaming performance with its 3D V-Cache technology. The motherboard acts as the nervous system, connecting every component through high-speed lanes. DDR6 RAM provides a massive jump in data transfer rates, offering speeds exceeding 12,800 MT/s to eliminate memory bottlenecks for power users. Before you start plugging things in, checking a step-by-step assembly guide helps you understand how these three parts physically interact on the tray.
Storage and Graphics: Speed Meets Visuals
Mechanical drives are obsolete for primary systems. NVMe M.2 SSDs utilizing PCIe 6.0 are now mandatory for modern operating systems, providing read speeds up to 28 GB/s. This speed ensures your PC boots in under five seconds and applications launch instantly. When selecting a GPU, match it to your monitor’s resolution:
- 1080p: Entry-level cards with 8GB VRAM are sufficient for high frame rates.
- 1440p: Mid-range cards with 12GB to 16GB VRAM are the current “sweet spot” for enthusiasts.
- 4K: High-end GPUs with 24GB VRAM and dedicated ray-tracing hardware are necessary for ultra-visuals.
If you’re building a “Business” rig for office tasks, integrated graphics found on many modern CPUs can save you hundreds of dollars. For more personalized recommendations on specific parts, you can browse our latest tech reviews to find the best value for your budget. Following this how to build a pc for beginners guide ensures you don’t overspend on hardware you won’t actually use.
Step-by-Step Assembly: Putting Your PC Together Safely
Building a computer is a tactile, rewarding process. Following this how to build a pc for beginners guide ensures you don’t miss small details that cause big headaches later. Before you start, clear a large workspace and grab a magnetic Phillips #2 screwdriver. You’re ready to transform that pile of boxes into a high-performance machine.
Place your motherboard on its anti-static bag or the box it came in. Open the CPU socket lever and carefully drop the processor in. You must align the small gold triangle on the corner of the CPU with the mark on the socket. For RAM, identify slots 2 and 4 for dual-channel performance. Push the sticks down firmly until the side tabs click into place.
Step 2: Mounting the Motherboard
Ensure the I/O shield is snapped into the back of the case first. Align the motherboard with the pre-installed standoffs inside the chassis. Most ATX boards require 9 screws to stay secure. Don’t over-tighten them; a snug fit is enough to prevent vibration and ensure grounding.
Step 3: Installing the Power Supply (PSU)
Slide the PSU into the bottom of the case with the fan facing the bottom vent. Secure it with the four provided screws. Immediately route the 24-pin motherboard cable and the 8-pin CPU power cable through the nearest grommets so they’re ready for connection.
Step 4: Seating the Graphics Card (GPU)
Remove the metal expansion slot covers on the back of your case that align with your top PCIe x16 slot. Open the plastic latch on the slot, then press the GPU down until you hear a distinct click. Screw the GPU bracket into the case to prevent sagging.
Step 5: Final Cable Connections
Connect the tiny front panel headers for the power button and LEDs. These are often the most frustrating part, so refer to your motherboard manual for the exact pin layout. Finally, plug in any SATA cables for older storage drives and your GPU power connectors.
The “Outside-the-Box” Test
Pro builders often perform a test boot before the motherboard ever touches the case. It takes about 10 minutes but saves hours if a component is dead on arrival. Place the motherboard on its box, install the CPU, RAM, and GPU, and connect the PSU. You can jump-start the system by briefly touching a screwdriver to the two “Power SW” pins. A successful Power On Self Test (POST) is confirmed when the fans spin and the BIOS splash screen appears on your monitor.
Mastering Cable Management
A clean build isn’t just about aesthetics. Proper cable routing can lower internal temperatures by 3 to 5 degrees Celsius by removing airflow obstructions. Use Velcro straps instead of plastic zip ties so you can easily make changes later. Bundle excess cables in the “basement” near the PSU to keep them out of sight. Just as you might clear cache on iPhone to keep your software running efficiently, managing your physical cables prevents dust buildup and keeps your hardware healthy for years.
The First Boot: BIOS, OS Installation, and Drivers
The moment of truth arrives when you press the power button for the first time. If your fans spin and the screen lights up, you’ve successfully navigated the physical assembly. This stage of our how to build a pc for beginners guide focuses on the software environment that makes your hardware functional. It’s the bridge between a pile of expensive parts and a working machine.
Your first stop is the BIOS or UEFI. Repeatedly tap the Delete or F2 key as the computer starts to enter this menu. By early 2026, motherboard manufacturers have streamlined these interfaces, but the first priority remains system stability. You should check your motherboard manufacturer’s website using a secondary device to download the latest BIOS version. Updating the BIOS ensures compatibility with the newest 2026 CPU architectures and fixes memory training issues that often impact hardware released within the last 6 months.
Next, you’ll need a bootable USB drive with at least 16GB of space. Use the Windows 11 Media Creation Tool or the latest 2026 OS installer on a separate laptop to prepare the drive. Plug it into a USB 3.2 port on your new PC, restart, and the installation wizard should begin automatically. If it doesn’t, you’ll need to adjust where the computer looks for an operating system.
Configuring Your BIOS Settings
Before installing the OS, you must optimize your hardware settings. Most RAM defaults to a slower safe speed, so you need to enable XMP for Intel or EXPO for AMD profiles to reach advertised speeds like 6000MHz or higher. Ensure your boot priority is set to your primary NVMe SSD so the system knows where to install the files. You also need to verify that Secure Boot is enabled; this is a mandatory security feature for modern operating systems that prevents unauthorized code from running during the start-up sequence.
Post-Installation Checklist
Once you reach the desktop, your work isn’t quite finished. Follow these steps to ensure peak performance and reliability:
- Install Essential Drivers: Download the latest GPU drivers from NVIDIA or AMD. Don’t forget the chipset and LAN drivers from your motherboard’s specific support page to ensure your 2.5Gbps or 5Gbps ethernet ports work at full speed.
- Check Windows Update: Run this utility at least twice. It often catches missing system-level drivers that the initial OS installation missed.
- Run a Stress Test: Use a tool like Cinebench R24 to push your CPU for 10 minutes. If your temperatures stay below 90°C during the test, your thermal paste and cooler are doing their jobs.
- Finalize Your Workspace: A high-performance build deserves a professional setup. While you’re optimizing your new digital environment, you can check out our recommendations for The Best Keyboards to complete your desk.
Common Mistakes and Future-Proofing Your Rig
Building your first computer is a rewarding rite of passage. Even when following a how to build a pc for beginners guide closely, small errors can lead to big headaches. The most infamous mistake is forgetting the I/O shield. If you don’t snap this metal plate into the case before installing the motherboard, you’ll have to dismantle the entire system to fix it later. Another classic error involves the display cables. Always plug your monitor into the dedicated GPU ports rather than the motherboard. Plugging into the motherboard uses the weak integrated graphics, which can slash your frame rates by over 70% in demanding games.
Thermal paste application is another area where beginners often stumble. You only need a pea-sized amount in the center of the CPU. Too much paste creates a messy overflow that can insulate rather than conduct; too little leads to thermal throttling where the CPU hits 100°C and slows down to protect itself. Finally, don’t cut corners on the Power Supply Unit (PSU). While a 600W unit might run a mid-range 2026 build, an 850W 80+ Gold unit provides the overhead needed for high-end GPUs that can spike to 450W on their own. Using this how to build a pc for beginners guide as a checklist ensures you don’t miss these critical details.
Troubleshooting the “No Post” Scenario
If you press the power button and the screen stays black, don’t panic. Statistics show that roughly 90% of boot failures stem from loose connections. First, check that the RAM is fully seated; you should hear a distinct snap on both ends of the stick. Ensure the 24-pin main power connector is flush against the motherboard socket. Most motherboards in 2026 include “Debug LEDs” labeled CPU, DRAM, VGA, and BOOT. If the DRAM light stays red, your memory is the culprit. If the system remains unresponsive, clear the CMOS by removing the coin-shaped battery for 30 seconds. This resets BIOS settings to factory defaults and often solves compatibility loops.
Planning for Future Upgrades
Future-proofing means making smart choices today to save money in three years. In 2026, prioritize modern sockets like AMD’s AM5 or Intel’s LGA 1851. These platforms are expected to support multiple CPU generations, allowing you to swap your processor in 2028 without buying a new motherboard. Additionally, choose a case with at least 340mm of GPU clearance. Modern graphics cards are getting longer and thicker, often occupying 3.5 slots. Your new rig is more than just a gaming machine; it is a powerful platform for professional growth or Starting a Blog to document your tech journey. With the right foundation, your PC will remain relevant for years to come.
Launch Your 2026 Custom PC Build Today
Building your own computer is a rewarding milestone that grants you total control over your digital life. You’ve learned that successful builds rely on meticulous planning and avoiding common 2026 assembly pitfalls. By prioritizing real-world value over flashy marketing, you can assemble a machine that remains relevant for at least 5 years. This how to build a pc for beginners guide simplifies the process, ensuring your first boot is a success without the stress of hardware failure. Whether you’re building for school, business, or creativity, the foundational steps remain the same.
Success in custom building comes down to choosing parts that work together perfectly. Our team of 30-year tech veterans tests every component through a community-driven review process to ensure you get the best performance for your budget. We focus on parts that deliver measurable results in daily tasks and heavy gaming workloads. Since hardware changes fast, relying on expert testing saves you hours of troubleshooting. Ready to find your perfect hardware? Check out our Editor’s Picks for the best PC components of 2026. You’ve got the knowledge and the tools; now it’s time to build something incredible.
Frequently Asked Questions
Is building a PC cheaper than buying one in 2026?
Yes, building a PC typically saves you between 10% and 20% compared to purchasing a pre-built system with identical specifications. While entry-level office computers are often cheaper at retail due to bulk manufacturing, gaming and workstation builds offer significantly better value when you source parts yourself. By following this how to build a pc for beginners guide, you avoid the assembly fees that often add $150 to $300 to the final price tag.
How long does it take for a beginner to build a PC?
A first-time builder should expect to spend 3 to 6 hours on their first assembly. This timeframe includes unboxing components, careful part installation, and initial cable management. You’ll likely spend about 60 minutes of that time just reading manuals and ensuring every cable is in the right slot. Experienced builders can finish the process in under 90 minutes, but rushing often leads to simple mistakes that take longer to fix later.
Do I need an anti-static wrist strap to build a PC?
You don’t strictly need an anti-static strap, but it’s a $10 insurance policy for your expensive components. Modern hardware is more resilient than older technology, but a single static discharge can still ruin a motherboard or RAM stick. If you choose not to use one, touch the metal chassis of your plugged-in but turned-off power supply every 5 minutes to ground yourself. Avoid building on carpeted surfaces to reduce risk.
What happens if I drop a component or bend a CPU pin?
Dropping a component often causes micro-fractures in the PCB that lead to immediate or delayed hardware failure. If you bend a CPU pin, you can sometimes realign it using a 0.5mm mechanical pencil or fine-tipped tweezers under a magnifying glass. However, 85% of manufacturers consider physical damage a void of warranty. It’s vital to handle your parts with extreme care and work over a flat, stable table.
Can I build a PC for AI and machine learning on a budget?
You can build a capable AI starter rig by prioritizing a GPU with at least 12GB of VRAM, such as an RTX 3060 or 4060 Ti. AI tasks rely heavily on CUDA cores and memory capacity rather than raw processor clock speed. Budget around 40% of your total spend for the graphics card to ensure you can run local LLMs like Llama 3 or Stable Diffusion efficiently without running out of memory.
What are the best places to buy PC parts online in 2026?
Amazon and Newegg remain the top online retailers for most builders due to their robust return policies and massive inventory. For those in the United States, Micro Center offers the best in-store bundle deals, often saving customers $50 to $100 on CPU and motherboard combinations. Always check PCPartPicker to compare live prices across 10 or more major vendors before you finalize your purchase to find the best deals.
How often should I clean the dust out of my custom PC?
You should perform a basic cleaning every 3 to 6 months to prevent thermal throttling. Dust buildup can increase component temperatures by 5 to 10 degrees Celsius, which reduces the lifespan of your fans and processors. Use a can of compressed air or an electric duster to clear the filters and heatsinks twice a year. This simple maintenance keeps the system running quietly and prevents performance drops during heavy use.
Is it hard to install Windows on a brand-new PC?
Installing Windows 11 is a straightforward 20-minute process using a USB bootable drive. This how to build a pc for beginners guide recommends creating your installation media on an 8GB or larger flash drive before you start your build. Once you plug it in and turn on the PC, the installer guides you through 5 simple steps to get your desktop ready. Most modern motherboards recognize the boot drive automatically, making the process very user-friendly.