

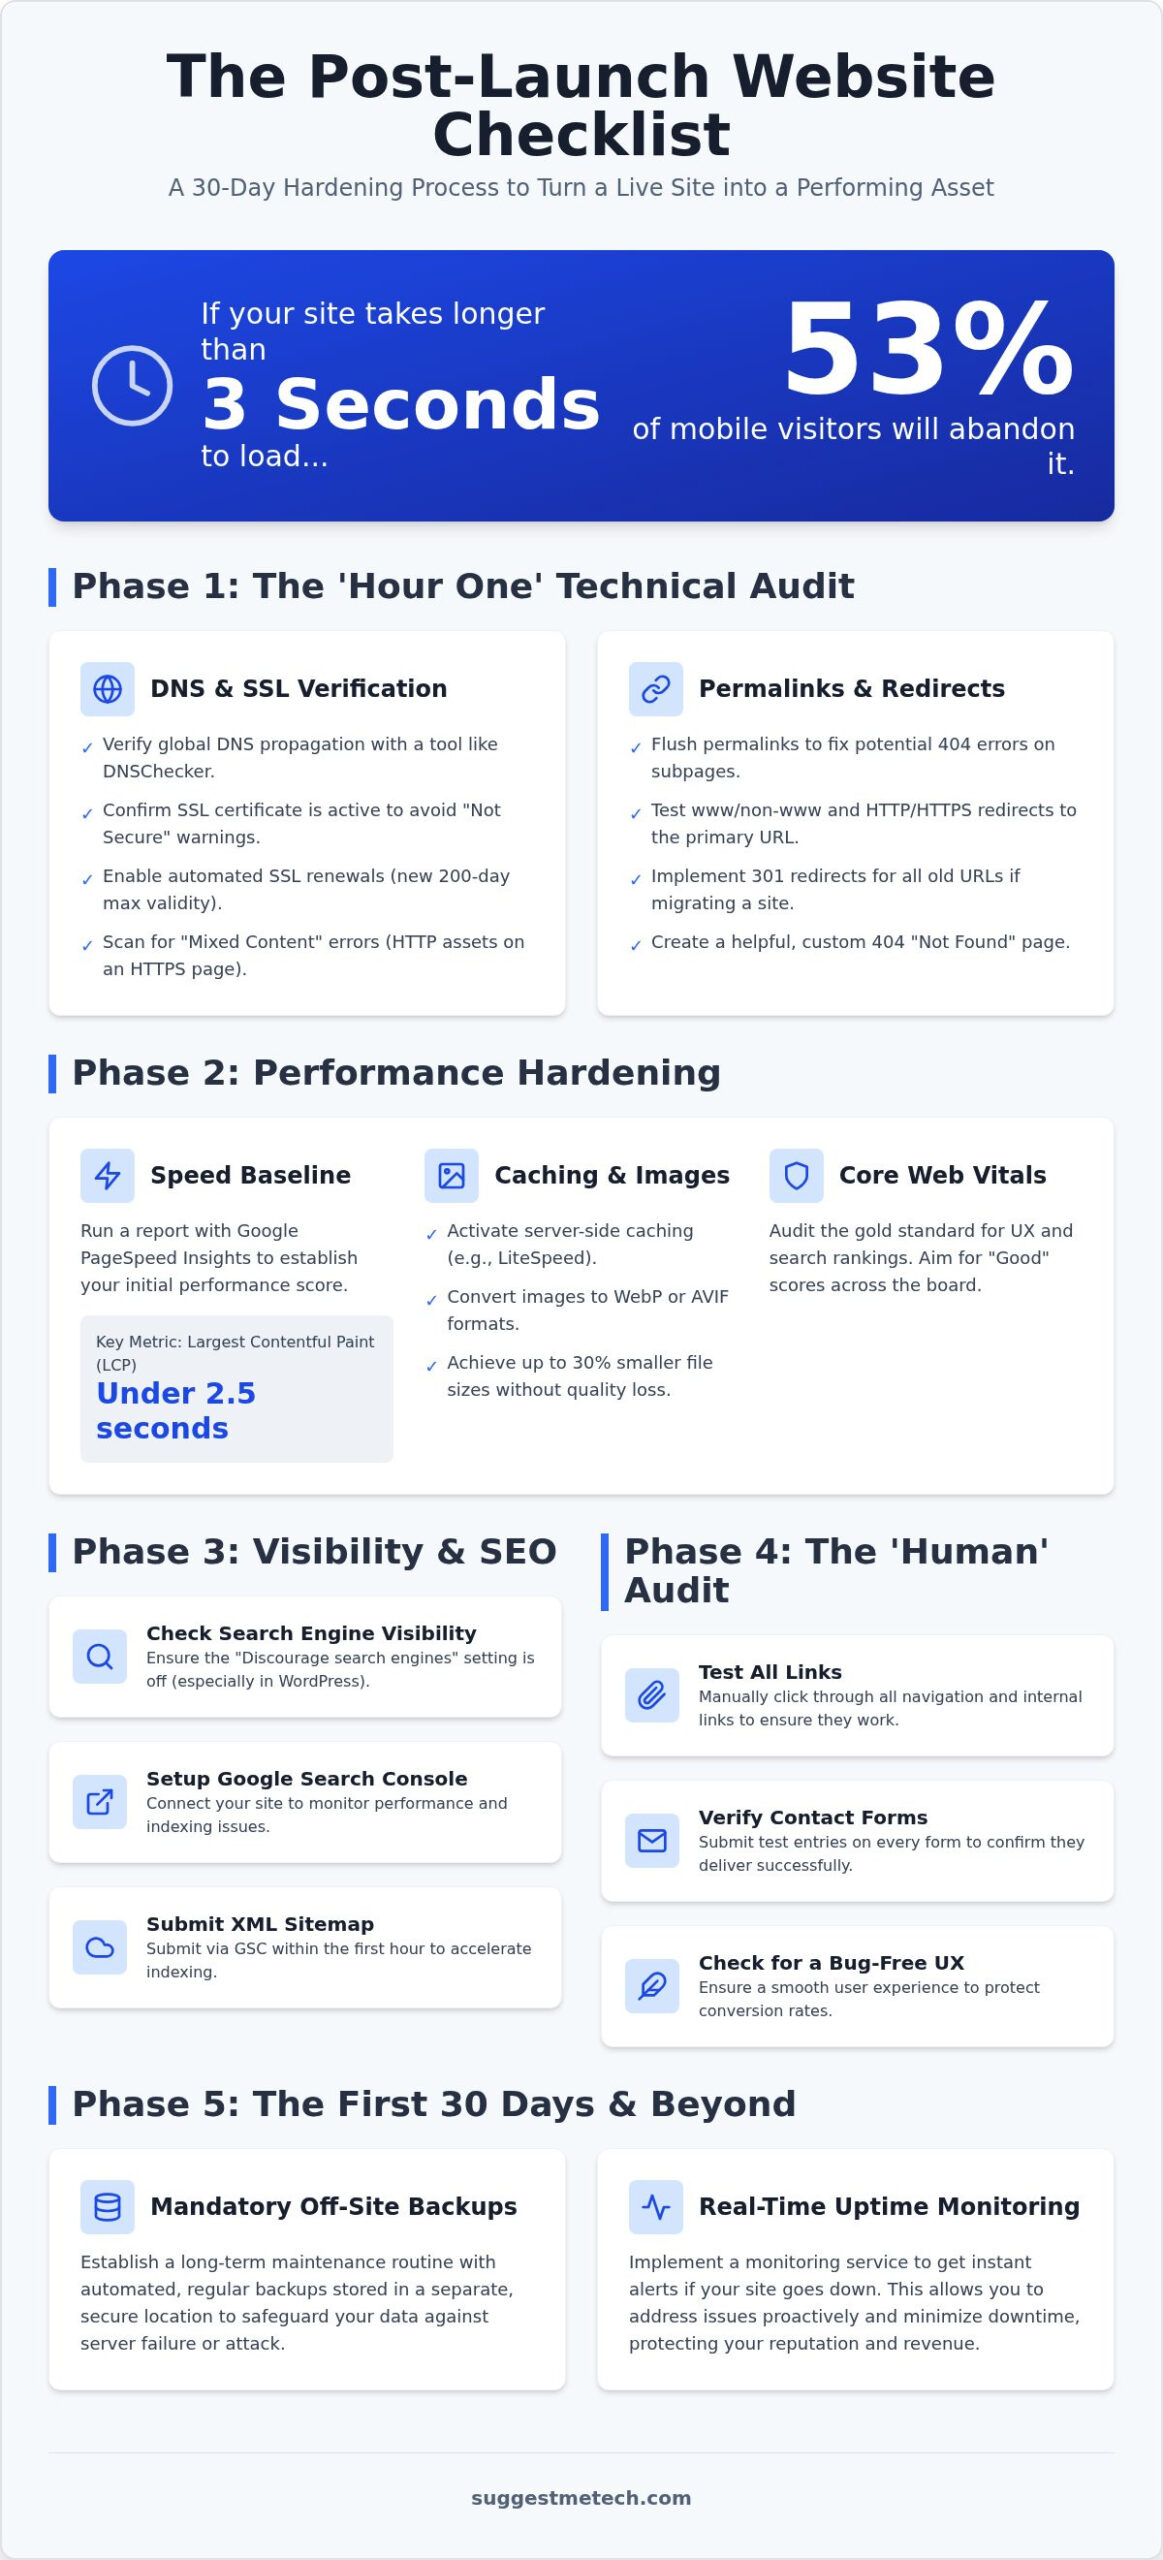
Did you know that 53% of mobile visitors will abandon your page if it takes longer than three seconds to load? You’ve spent weeks or months building your site, and seeing it finally go live is a massive relief. However, that sense of accomplishment often comes with a side of anxiety as you search for a reliable post-launch website checklist. You’re likely worried about broken forms, hidden DNS issues, or whether Google can even find your new content. It’s completely normal to feel uncertain about your security settings or SEO indexing the moment you hit publish.
At SuggestMeTech, we believe a successful launch isn’t just a single event; it’s a 30 day hardening process that turns a live site into a performing asset. This guide ensures your new site is secure, fast, and fully optimized for the 2026 digital environment. We will guide you through the critical first 48 hours and beyond, covering everything from the new 200 day SSL certificate lifecycles to tracking AI assistant traffic in GA4. You’ll get a step by step breakdown of technical audits, accessibility requirements, and performance benchmarks to give you total peace of mind that your site is performing at its best.
Key Takeaways
- Secure global access by verifying DNS propagation and SSL status to avoid “Not Secure” warnings that drive visitors away.
- Follow our post-launch website checklist to run baseline speed reports and activate server-side caching through your hosting provider’s built-in tools.
- Accelerate search engine indexing by setting up Google Search Console and submitting your XML sitemap within the first hour of going live.
- Protect your conversion rates by manually testing all contact forms and navigation links to ensure a bug-free user experience.
- Establish a long-term maintenance routine with mandatory off-site backups and real-time uptime monitoring to safeguard your site’s performance.
Immediate Post-Launch: The ‘Hour One’ Technical Audit
The moment you flip the switch from “Staging” to “Production” is the most high-stakes phase of the entire web development process. You’ve launched, but you need to verify that the site is actually working for everyone. The first item on your post-launch website checklist should be checking the “Search Engine Visibility” toggle if you’re using WordPress. It’s a simple checkbox in the Reading settings that prevents search engines from indexing your site. If you forget to uncheck this, your site remains invisible to Google, effectively killing your organic traffic before it even starts.
DNS and SSL Verification
Once you update your nameservers, your domain doesn’t instantly point to the new server for every user. Use a tool like DNSChecker to verify global propagation. It shows you if your records have updated in London, Tokyo, and New York. If you see “X” marks in certain regions, those users are still seeing your old site or a cached error page. This propagation can take time, but you want to see green checkmarks in your primary target markets within the first hour.
Next, confirm your security status. As of March 15, 2026, the maximum validity for public SSL certificates is now only 200 days. This change means you must ensure your hosting provider has automated renewals enabled. Check your hosting panel, like Hostinger’s hPanel or SiteGround’s security tools, to confirm your SSL is active. A “Not Secure” browser warning is the fastest way to lose a new visitor’s trust. Look out for “Mixed Content” errors too. These happen when your site is HTTPS, but specific images or scripts are still trying to load via an insecure HTTP connection, which can break your site’s layout or functionality.
Permalinks and Redirect Strategy
If you’ve moved from a staging URL or a different CMS, your link structure might be broken. The first fix is simple: go to your settings and flush your permalinks. This refreshes the rewrite rules and often fixes “404 Not Found” errors on your subpages instantly. You also need to test your primary redirects. Type your URL without the “www” and then with “http” instead of “https.” Your site should automatically force the user to your preferred, secure version every time. If it doesn’t, you’re splitting your SEO authority and confusing search engines.
For those migrating an existing site, 301 redirects are mandatory. You don’t want to lose the SEO value of your old URLs. Every old link should point to its new equivalent. Finally, build a custom 404 page. Even with a perfect post-launch website checklist, a user might mistype a URL. A helpful 404 page with a search bar or a link back to the homepage keeps that user on your site instead of sending them back to the search results. This small UX detail can save a bounce and turn a lost visitor into a customer.
Performance Hardening: Optimizing for Speed and 2026 Standards
Speed isn’t just a luxury; it’s a survival requirement. If your site takes longer than three seconds to load, 53% of mobile visitors will simply leave. Your first step after verifying DNS is to run a baseline report using Google PageSpeed Insights. This tool gives you a clear look at how both desktop and mobile users experience your site. While you’re reviewing these numbers, consult a professional post-launch checklist to ensure you haven’t missed any hidden bottlenecks that could frustrate your early adopters.
Don’t rely on browser-level caching alone. You should configure server-side caching immediately to handle traffic spikes. Most high-quality web hosting providers offer built-in optimization tools like SiteGround’s SuperCacher or Hostinger’s LiteSpeed integration. These tools serve static versions of your pages, which significantly reduces the load on your server. While you’re at it, audit your image formats. In 2026, using PNG or JPEG for large hero images is outdated. Switch to WebP or AVIF to cut file sizes by up to 30% without losing quality. If you’re still choosing a platform, you can compare hosting features to see which ones offer the best built-in performance tools.
Core Web Vitals Audit
Google’s Core Web Vitals are the gold standard for user experience and search rankings. For a successful launch, your Largest Contentful Paint (LCP) must be under 2.5 seconds. You also need to keep your Cumulative Layout Shift (CLS) below 0.1 by defining specific height and width dimensions for every image and ad slot. Because Google uses mobile-first indexing, your site’s mobile performance is now the primary factor determining where you rank in search results.
Asset Optimization and CDNs
Even the fastest server can’t beat physics. If your server is in New York and your visitor is in Sydney, they’ll experience lag. Enable a Content Delivery Network (CDN) like Cloudflare to cache your assets on servers closer to your users. Another essential step on your post-launch website checklist is to minify your CSS, JavaScript, and HTML. This process removes unnecessary spaces and comments, shrinking your total page weight. Finally, review your third-party scripts. Chatbots and tracking pixels often delay the initial load. Use “defer” or “async” tags to ensure these scripts don’t block the rest of your content from appearing.
Visibility and SEO: Telling Search Engines You’ve Arrived
Your website is live, but it doesn’t truly exist to search engines until you invite them in. The most critical step on your post-launch website checklist is verifying your property in Google Search Console and Bing Webmaster Tools. These platforms act as your direct line of communication with search engines, providing alerts if something breaks. Once you’ve verified ownership, use the “URL Inspection” tool in Google Search Console to perform a Live URL test. This confirms that Google’s bots can successfully crawl and render your pages without being blocked by technical errors or server side firewall settings.
Sitemaps and Indexing
Submitting an XML sitemap is the fastest way to get your content indexed by search bots. This file acts as a roadmap, showing bots exactly which pages are the most important for your business. Before you hit submit, double check your robots.txt file. It’s common for developers to leave “Disallow: /” in place during the build phase to keep the staging site private. If you don’t remove this block, search engines will stay away from the entire site. You should also scan for accidental “noindex” tags on public pages that were meant for internal testing only. Reviewing the University of Iowa’s Web Community Launch Checklist can help you remember these small but vital technical details that often slip through the cracks during a hectic launch day.
Tracking and Analytics Setup
You can’t improve what you don’t measure. Install Google Analytics 4 (GA4) across every page of your site to start collecting user data immediately. In 2026, GA4 is the undisputed standard for web analytics. It now includes a dedicated “AI Assistant” traffic channel to track referrals from chatbots like ChatGPT, Gemini, and Claude. Verify that your tracking code fires correctly, especially on “Thank You” pages or order confirmation screens where conversions happen. Setting up custom conversion events, such as form submissions or specific button clicks, allows you to see exactly how users interact with your new layout and where they might be getting stuck.
Don’t keep your data in silos. Integrate your Search Console account directly with GA4 to get a unified view of search performance. This connection shows you which keywords are driving traffic and what those visitors do once they land on your site. By closing the loop between search intent and on-site behavior, you can make smarter decisions for your first round of content updates. This level of visibility ensures that your hard work translates into measurable growth right from the first week. If you notice high bounce rates on mobile, refer back to our earlier performance audit to check your Core Web Vitals again.
The ‘Human’ Audit: UX, Functionality, and Legal Compliance
Technical perfection doesn’t matter if your “Contact Us” button leads to a dead end. While the previous steps focused on bots and servers, this part of your post-launch website checklist focuses on the actual people using your site. You need to perform a “Click Audit” on every single navigation menu item and footer link. It’s surprisingly common for social media icons to point to placeholder URLs or for the “Terms of Service” link in the footer to trigger a 404 error. Don’t assume your site looks the same on every screen. Review your layout on Chrome, Safari, and Firefox. You should also test on multiple mobile devices to ensure that buttons are large enough to tap and that text remains readable without zooming.
Optimizing for readability is also crucial; tools like Teggl allow users to view web pages in a bolded reading mode, which can help them process information more quickly and stay engaged with your content.
Form and Conversion Testing
Broken forms are the number one killer of new website conversions. You must submit a test entry on every single form, from simple newsletter signups to complex multi-step quote requests. Check for validation errors; for example, does the form correctly reject an invalid email address? Once you hit submit, verify that the “Success Message” appears or that the user is redirected to the correct thank you page. The audit doesn’t end on the website. Log into your email and confirm that the notification actually arrived. Check your spam folder too. If your notifications are being filtered out, you may need to adjust your SMTP settings or check your hosting provider’s email deliverability tools.
Accessibility and Legal Check
Legal compliance is no longer optional. In 2026, healthcare organizations receiving federal funding must already meet strict accessibility standards, and many other entities face a WCAG 2.1 Level AA deadline in early 2027. Despite this, nearly 96% of the top one million homepages still have WCAG violations. Run an accessibility scan to identify issues with color contrast or missing alt text on images. These small fixes ensure your site is usable for everyone and protect you from potential legal headaches.
Finally, ensure your legal pages are live and reachable. Your Privacy Policy and Terms of Service should be updated to reflect current GDPR and CCPA requirements. Verify that your cookie consent banner is functioning correctly and isn’t blocking essential site features before a user interacts with it. If you’re looking for a foundation that makes these technical and legal requirements easier to manage, read our reviews on the best web hosting services to find platforms that offer integrated security and compliance plugins by default. Taking these steps now prevents a minor oversight from turning into a major liability during your first month live.
The First 30 Days: Ongoing Monitoring and Maintenance
Hitting the publish button is a major milestone, but your work isn’t over yet. The first 30 days after a site goes live are for “hardening” your assets and gathering the data needed for long-term growth. This phase of your post-launch website checklist involves shifting from technical setup to active operations. You need to transition from “fixing bugs” to “optimizing performance” based on how your actual visitors interact with the site. Establishing a rhythm for maintenance now will prevent security vulnerabilities and technical debt from piling up later.
Security and Backups
You must verify that your web hosting backup system is actually running and creating restorable files. Automated backups are standard, but they’re useless if they’re only stored on the same server as your website. To ensure total safety, follow the 3-2-1 backup rule: keep three copies of your data on two different media types, with at least one copy stored off-site. This protects you if your hosting provider experiences a localized data center failure.
Security requires constant vigilance. Install a dedicated security plugin to monitor for brute-force login attempts and malware injections. Many providers like SiteGround or Hostinger offer their own security layers, but an extra plugin can provide real-time alerts directly to your inbox. You should also set up uptime monitoring through a service like UptimeRobot. This ensures you’re the first to know if the site goes down, rather than finding out from an angry customer three hours later. Finally, schedule a recurring monthly update cycle for all plugins, themes, and your CMS core to patch any newly discovered security holes.
User Feedback and Iteration
Data tells you what is happening, but user feedback tells you why. Install a heatmapping tool like Hotjar or Microsoft Clarity to see where users click and where they get frustrated. You might find that people are trying to click an image that isn’t a link, or that they’re missing your primary call-to-action because it’s too far down the page. Don’t rely solely on automated tools; ask three people who weren’t involved in the build to complete a specific task, like finding a product or filling out a quote form. Watching a fresh pair of eyes navigate your site often reveals friction points that developers and owners are too close to see.
After your first full month, dive back into your analytics. Look for pages with the highest bounce rates or the lowest time-on-page metrics. In 2026, user intent is everything, so if a page has high traffic but no engagement, the content likely doesn’t match what the user was looking for. Use these insights to iterate on your design and copy. This 30-day review turns your post-launch website checklist from a simple “to-do” list into a strategic framework for continuous improvement and measurable business success.
Turning Your Launch into Lasting Performance
A successful launch is just the beginning of your site’s lifecycle. By following this post-launch website checklist, you’ve moved past the initial “Hour One” technical hurdles and set a high bar for 2026 performance standards. You’ve verified that your SSL certificates are current, your forms are delivering leads, and your site meets the latest accessibility requirements. Remember that the first 30 days are your most valuable window for gathering user feedback and refining your UX based on real-world behavior. This proactive approach ensures your site doesn’t just exist; it performs. As you build your presence, you can learn more about WhoRatesMe to discover how their Google-compliant plan helps businesses manage their online reputation effectively.
Reliable infrastructure is the secret to maintaining these gains over the long term. At SuggestMeTech, we provide expert hosting comparisons and step-by-step tech guides to help you navigate complex choices with confidence. Whether you’re optimizing for mobile speed or securing your data with a strict backup routine, having the right foundation makes all the difference. Ready to build your next project? Check out our top-rated web hosting picks for 2026.
You’ve done the hard work of getting live. Now it’s time to stay vigilant and watch your site grow into a high-performing asset that serves your audience perfectly. Good luck with your new site.
Frequently Asked Questions
How long does DNS propagation take after launching a website?
DNS propagation usually takes 24 to 48 hours to complete across the entire globe. While some users might see your new site within minutes, others will still see the old version or a cached error page for a day or two. This delay happens because different internet service providers update their records at different speeds. You can monitor this progress using global DNS checking tools to see where your site is currently live.
Why isn’t my new website showing up on Google search results yet?
Google won’t show your site until its bots have successfully crawled and indexed your new content. This process can take a few days or even weeks depending on how often search engines visit your domain. To speed things up, make sure you’ve verified your site in Search Console and submitted a fresh XML sitemap. This tells search engines exactly where to find your most important pages immediately.
What is the most common mistake people make after launching a site?
Leaving the “Search Engine Visibility” setting turned off is the most common and damaging mistake. In WordPress, this simple checkbox tells search engines to ignore your site completely. It’s a vital step on your post-launch website checklist to ensure this is unchecked once you go live. Many owners forget this small detail and wonder why they aren’t getting any organic traffic weeks later.
Do I really need a security plugin if my hosting provider has security?
You need a security plugin because hosting-level protection and application-level protection serve different purposes. Your host secures the server, but a plugin protects your specific site from brute-force logins and malicious file injections. In 2026, relying on just one layer of defense is risky. A dedicated security plugin provides real-time alerts and firewall rules that your hosting provider might not include by default.
How often should I update my website’s plugins and themes?
You should update your plugins and themes at least once a week. Frequent updates are necessary because developers constantly release patches for security vulnerabilities and performance bugs. If you let your site fall behind, you risk breaking its functionality or leaving it open to hackers. A consistent update cycle keeps your site running smoothly and ensures it remains compatible with new web browser standards.
What happens if I find a broken link after the site is live?
You should fix broken links immediately by updating the URL or setting up a 301 redirect to a relevant page. Broken links frustrate your visitors and signal to search engines that your site isn’t well-maintained. Including a link audit in your post-launch website checklist helps you find these errors before they impact your bounce rates. A clean link structure is essential for both user experience and SEO.
Should I start running ads immediately after launch?
You should wait to run ads until you’ve verified that your site is fully functional and optimized. Launching paid campaigns before testing your forms and page speed can lead to wasted budget on a poor user experience. Once you’ve confirmed that your conversion paths are working and your site loads quickly on mobile, you can start your advertising efforts with much more confidence.
How do I check if my website is mobile-friendly?
Use Google PageSpeed Insights or the built-in Lighthouse tool in Chrome to test your mobile usability. These tools analyze your site’s layout, font sizes, and button spacing to ensure they meet modern standards. Since mobile-first indexing is the primary way search engines rank sites in 2026, having a mobile-friendly design is mandatory. Don’t forget to manually test your site on several different physical devices too.