The most expensive professional software is often the worst choice for your first project. You don’t need a Hollywood budget or a computer science degree to create stunning content. Most new creators waste hours fighting complex interfaces when the best video editing software for beginners should actually work with you, not against you.
We understand the frustration of “free” programs that hide giant watermarks until the final export or software that makes your laptop lag and crash. It’s discouraging when technical jargon like codecs and bitrates gets in the way of your creativity. You want a tool that feels intuitive and lets you focus on the story you’re telling rather than the buttons you’re pressing.
This guide will help you find a tool you can master in a single afternoon without a steep learning curve. We’ll compare the top 2026 options based on your current hardware and creative goals, ensuring you can export high-quality videos for YouTube or social media immediately. We’ll also help you determine if your current computer is ready for the task or if it’s time for a hardware upgrade first.
Key Takeaways
- Identify the best video editing software for beginners by matching tools to your specific skill level and hardware capacity rather than just looking at feature lists.
- Apply the “Three-Click Rule” to evaluate how quickly you can go from importing footage to making your first cut in any new program.
- Learn why CPU and RAM are more critical for smooth editing than screen size and how to verify if your current device can handle 2026 software demands.
- Avoid common “free version” pitfalls like hidden watermarks and calculate the true two-year cost of subscription models compared to lifetime licenses.
- Master a simple two-step project roadmap that prioritizes file organization and story structure over complex visual effects to finish your first video faster.
What Makes Video Editing Software ‘Beginner-Friendly’ in 2026?
In 2026, the best video editing software for beginners isn’t defined by how many features it packs into a menu. It’s defined by how many of those features it stays out of your way until you actually need them. For years, professional software was a maze of modular windows and hidden shortcuts. Today, “beginner-friendly” means a streamlined, intuitive interface that prioritizes flow over deep customization. You want a tool that feels like an extension of your creative thoughts, not a technical barrier you have to break down.
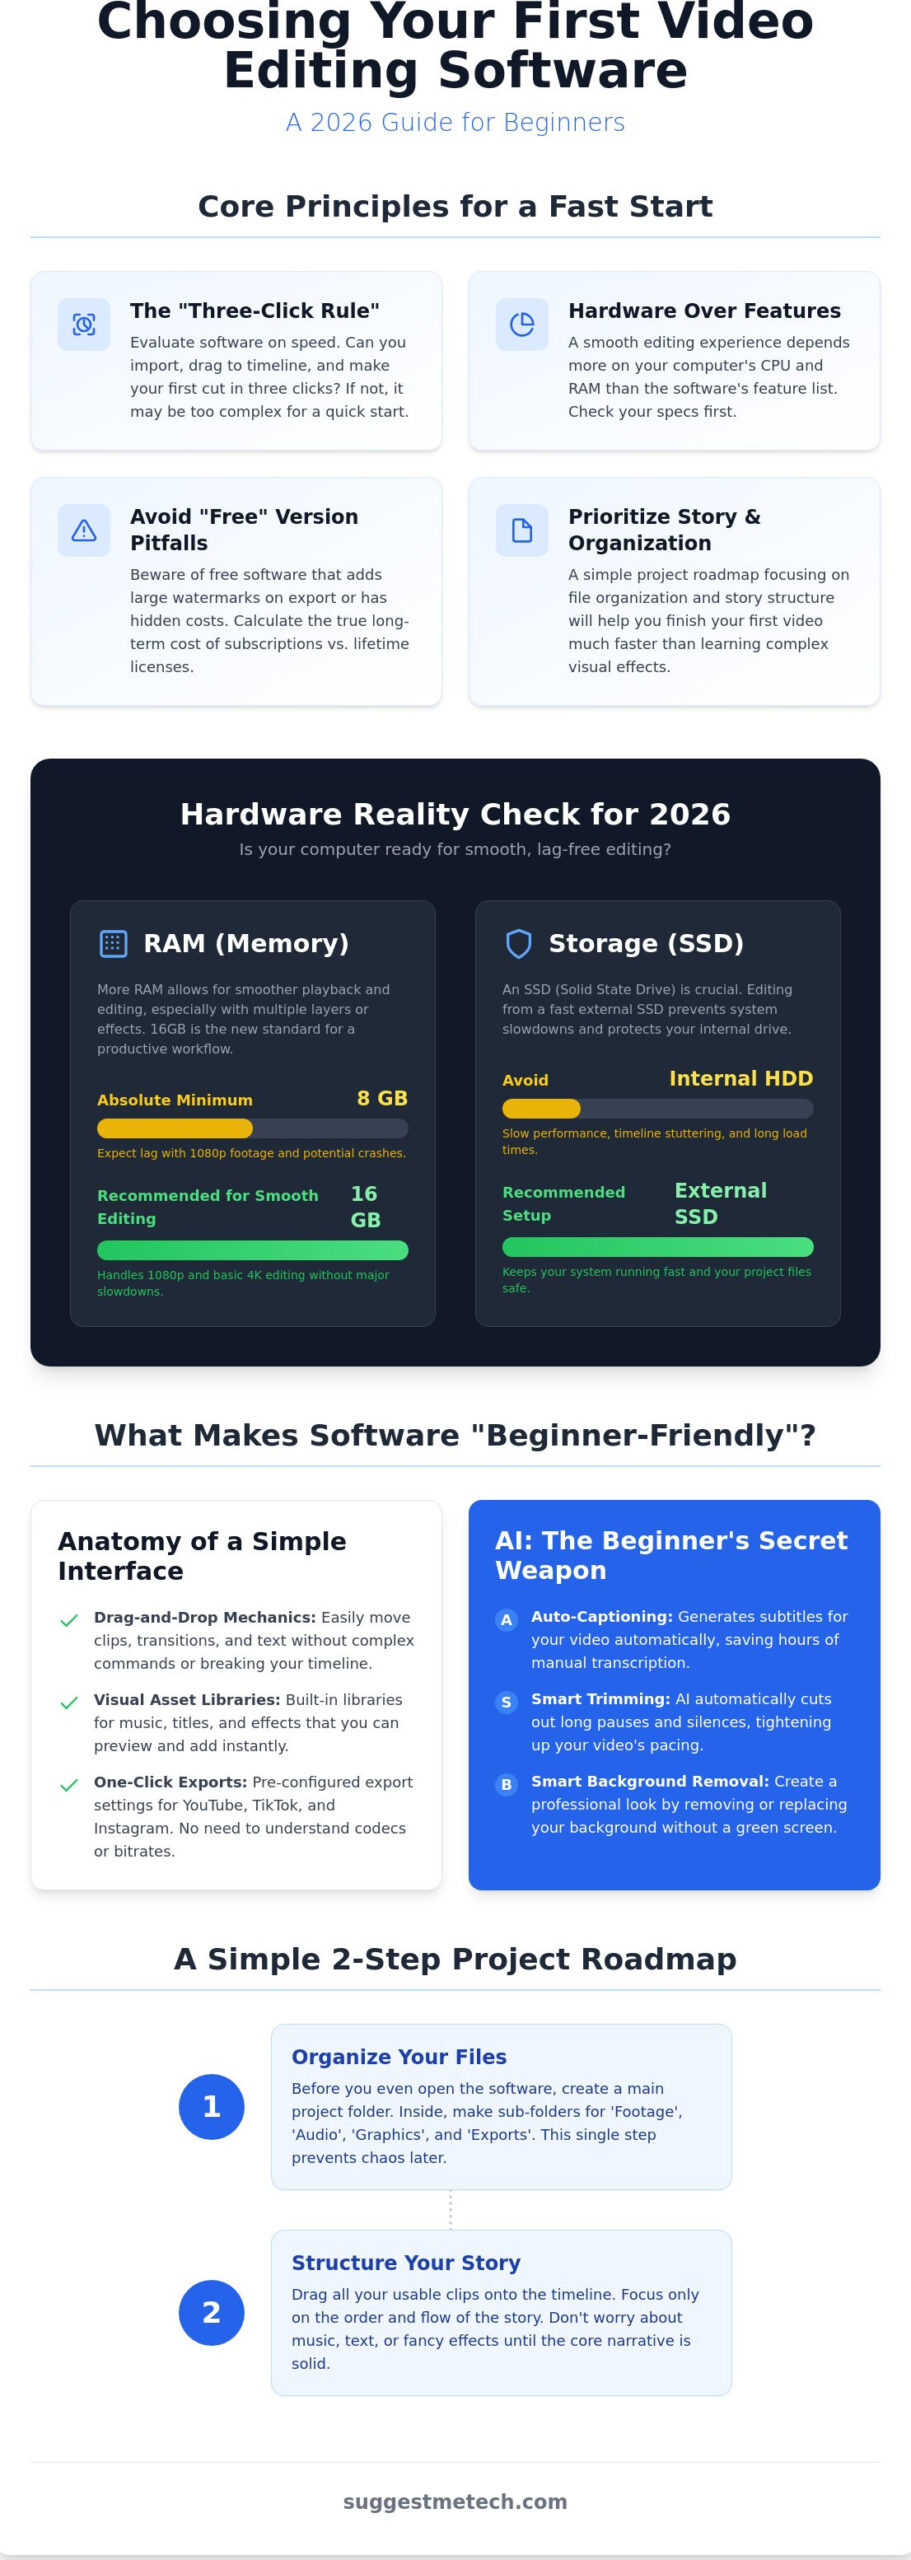
We use the “Three-Click Rule” as a benchmark for efficiency. If you can’t import a video file, drag it onto your timeline, and make your first cut in three clicks or less, the software is probably too complex for a fast start. Speed is your best friend when you’re learning. The faster you see results, the more likely you are to keep editing.
Don’t let industry terms like “Non-Linear Editing” (NLE) intimidate you. It’s just a fancy way of saying you can move clips around in any order you want without ruining the rest of your project. While you can find a comprehensive list of video editing software that includes high-end NLEs used by film studios, most modern beginner tools simplify this into a “magnetic” timeline that snaps clips together automatically.
The biggest shift in 2026 is the move toward AI-assisted editing. Features like auto-captioning and smart trimming are no longer luxury add-ons; they’re entry-level essentials. These tools handle the tedious parts of the process, like cutting out long silences or transcribing your audio, so you can spend your energy on the actual storytelling.
The Anatomy of a Simple Interface
A simple interface relies on drag-and-drop mechanics. This lets you move clips, add transitions, or layer text without worrying about “breaking” the timeline or losing sync with your audio. It’s about visual feedback. You should see exactly what’s happening as you move your mouse.
- Visual asset libraries: The best video editing software for beginners includes built-in music, motion titles, and transitions that you can preview instantly.
- One-click exports: You shouldn’t have to understand complex bitrates. Look for pre-configured settings tailored specifically for YouTube, TikTok, and Instagram.
AI Tools: The Beginner’s Secret Weapon
AI features act like a digital assistant that sits beside you while you work. Smart background removal allows you to create professional looks without a green screen, while auto-ducking balances your audio by lowering music volume whenever it detects a voiceover. If you’re short on time, AI script-to-video features can even generate a rough cut from a text prompt. This gives you a solid foundation to build upon rather than staring at a blank screen. These tools help you produce high-quality content while you’re still mastering the basics.
The Hardware Reality Check: Can Your Computer Handle It?
Before you download any new tools, we need to talk about your computer. Many people assume a large, vibrant screen is the most important factor for a creator, but the real work happens under the hood. Even the best video editing software for beginners will feel like a nightmare if your hardware isn’t up to the task. There’s a massive difference between a program “running” and actually allowing you to edit smoothly. If your laptop fans sound like a jet engine taking off during a simple 1080p edit, your system is struggling with a bottleneck.
If you’re planning to edit on your phone instead, storage becomes your primary hurdle rather than raw processing power. High-definition video files eat through gigabytes in minutes. Before you start your first project, it’s a good idea to learn how to clear cache on iPhone to ensure you have enough room for your source footage and the final export.
Minimum vs. Recommended Specs for 2026
In 2026, software requirements have stabilized, but the bar remains high for a lag-free experience. You don’t want to spend half your afternoon waiting for the timeline to refresh every time you make a cut.
- RAM: 8GB is now the absolute minimum just to open most modern apps. For a productive workflow without crashes, 16GB is the goal.
- Storage: Avoid editing off your internal hard drive if it’s nearly full. Using an external SSD prevents system slowdowns and keeps your project files organized.
- GPU Acceleration: This is your secret weapon for rendering. A dedicated graphics card significantly cuts down the time you spend waiting for your video to finish exporting.
Editing on a Budget Laptop
You don’t necessarily need a high-end gaming rig to get started. If your computer is older, look for a feature called “Proxy Editing.” This creates low-resolution copies of your footage for the editing phase, then switches back to the high-quality files for the final export. It’s the most effective way to make an entry-level laptop feel like a professional workstation.
For those with very limited hardware, browser-based editors are a lighter alternative to heavy desktop installations because they offload much of the processing power to the cloud. However, if you find that even basic tasks are taking forever, it might be time for an upgrade. Check out our guide on The Best Laptops of 2026 to find a machine that fits your budget and creative goals. If you’re unsure about your specific specs, drop a comment below and we can help you figure out if your current setup is ready for the journey.
The Best Video Editing Software for Beginners: 2026 Top Picks
Selecting the right tool depends entirely on your creative goals and how much time you want to spend learning the ropes. While professional suites offer endless menus, the best video editing software for beginners focuses on getting you from a raw file to a finished export without a headache. At SuggestMeTech, we’ve evaluated the current market to find the tools that balance power with an intuitive user experience.
If you’re still deciding on your first project, you can explore Cooking Recipes to see how So Yummy uses these beginner-friendly editing principles to create engaging tutorials and lifestyle hacks.
Wondershare Filmora 14 remains a top recommendation for its “drag-and-drop” philosophy. For approximately $79.99 for a perpetual license, you get access to advanced AI features that handle auto-captioning and smart trimming. Movavi Video Editor offers an even cleaner interface. It’s designed for those who feel overwhelmed by too many buttons, keeping the workspace focused on the essentials. For mobile creators, CapCut’s desktop version provides a familiar environment for the 81% of mobile editors who already use the app, but with the precision of a mouse and keyboard.
Adobe Premiere Elements 2026 serves as a bridge for those who eventually want to move into professional editing. It uses “Guided Edits” to teach you techniques while you work on your project. For Windows users who want to start immediately, Clipchamp is the built-in option that offers surprising power for quick edits without requiring a separate installation or a heavy financial investment.
Best for Social Media & Short-Form Content
If your goal is TikTok or Instagram Reels, the choice often comes down to CapCut versus Canva. Canva is excellent for template-based design, but CapCut wins for actual timeline editing. It features built-in vertical aspect ratios and a massive library of trending effects. It also allows direct-to-platform publishing, which saves you the step of transferring large files between your computer and your phone. These tools are the best video editing software for beginners who need to maintain a high-volume posting schedule, which is a key way for aspiring talent on the Unique Model & Talent Network to build visibility and attract industry experts.
Best for YouTube & Storytelling
For longer content, you need more control over the narrative flow. Filmora makes advanced keyframing simple, allowing you to animate text or images without complex menus. Adobe Premiere Elements is another strong contender here. Its step-by-step mode walks you through transitions and color correction to ensure your storytelling looks professional. If you’re worried about long export times for 4K video, CyberLink PowerDirector is the speed demon of the group. It’s optimized to render high-resolution projects faster than most other entry-level programs, with a perpetual license available for $139.99.
Free vs. Paid Software: Is It Worth the Investment?
The word “free” is the most effective marketing tool in the creative world, but it often comes with a hidden tax on your time or your final product. When searching for the best video editing software for beginners, you’ll encounter two types of free tools. Some are truly open-source projects built by communities, while others are “freemium” versions designed to hook you before asking for a credit card. Choosing between them depends on whether you value your money or your sanity more during the learning process.
The most common hurdle is the “Watermark Trap.” Many popular editors, like Wondershare Filmora, allow you to use every feature for free but slap a giant, translucent logo over your finished video upon export. This makes the file unusable for professional YouTube channels or business social media. If you want a truly free experience without watermarks, Apple users have iMovie, while Windows users can turn to Clipchamp. However, these tools eventually hit a ceiling in terms of advanced features and creative control.
You might hear experts recommend DaVinci Resolve 19 because the standard version is free and incredibly powerful. While it’s true that it’s a Hollywood-grade tool, it often fails the “Three-Click Rule” we discussed earlier. The learning curve is massive. For a beginner, spending $79.99 on a perpetual license for Filmora or $99.99 for a three-year Adobe Premiere Elements license is often a better investment. It buys you an interface that doesn’t require a semester of study just to understand the timeline.
When to Stick with Free Tools
Free software is perfect for personal projects, such as archiving family memories or making quick clips for friends. It’s also the best way to practice the fundamentals of “The Cut” and “The Transition” without financial pressure. If you aren’t sure if video editing will be a long-term hobby, start here. Open-source options like Shotcut or OpenShot provide professional-level features for $0, provided you’re willing to navigate a clunkier, less intuitive user interface.
When to Upgrade to a Paid Version
You’ll know it’s time to pay when the limitations start slowing you down. Paid versions typically unlock higher export resolutions, like 4K or 8K, which are essential for modern screens. You also gain access to massive libraries of copyright-cleared music and stock footage, saving you from potential legal headaches later. Most importantly, paid software comes with priority customer support. When your project won’t export an hour before a deadline, having a help desk to call is worth the entry price. If you’re still weighing your options, explore our latest tech reviews for deep dives into specific software performance.
How to Start Your First Project: A Beginner’s Roadmap
Starting your first project can feel overwhelming even with the best video editing software for beginners at your fingertips. The secret to success isn’t hidden in a complex menu; it’s found in your workflow. Most new creators fail because they try to add flashy effects before they’ve built a solid foundation. By following a structured roadmap, you’ll avoid the technical pitfalls that lead to frustration and abandoned projects.
Step 1 is the “Dumb Down” Phase. This is purely about organization. Before you ever open your editing app, you must organize your files. If you move a clip from your desktop to a folder after you’ve started editing, your software will lose the connection. This results in the dreaded “Missing File” error. Choosing the best video editing software for beginners is only half the battle; the rest is about maintaining a clean workspace so your computer doesn’t bog down.
Step 2 is the Rough Cut. During this phase, you should ignore every filter, transition, and title. Focus entirely on the story. Arrange your clips in order and trim the “dead air” at the start and end of each shot. If the story doesn’t work as a simple sequence of raw clips, no amount of editing magic will save it. Once the story flows, move to Step 3: Audio First. Viewers will tolerate a slightly blurry image, but they’ll turn off a video with peaking or muffled audio immediately. Balance your music and voiceovers before moving to Step 4, the “Polish.” This is where you finally add your titles, transitions, and basic colour correction to give the project a professional finish.
Organizing Your Creative Assets
Preventing technical errors starts with your folder structure. Create a master folder for your project with subfolders labeled “Footage,” “Audio,” and “Exports.” Use clear naming conventions like “Date_Location_Subject” so you can find specific shots instantly. This level of organization is a habit shared by professional creators. If you’re also thinking about how to present your work to a wider audience, see our guide on How to Start a Blog for tips on content planning and audience engagement.
Exporting for Success
When you finish your edit, you need to choose the right format. For 90% of creators, MP4 is the correct choice. It provides a high-quality image with a file size that’s easy to upload to YouTube or Instagram. MOV files are often higher quality but can be massive and difficult for some platforms to process. Always follow the “Check Twice” rule. Export a 30-second sample and watch it on your phone before you commit to the full export. This ensures your text is readable and your colours look correct on a mobile screen.
Which software are you leaning towards? Let us know in the comments and we’ll help you troubleshoot your setup!
Launch Your First Video Today
Finding the best video editing software for beginners is the first step toward becoming a confident creator. Remember that your choice should align with your specific goals, whether you’re aiming for viral TikToks or detailed YouTube stories. Don’t forget the hardware reality check we discussed earlier. Your software’s performance depends heavily on your computer’s CPU and RAM. Our 2026 hands-on testing ensures that the recommendations in this guide are practical and ready for current technology standards.
At SuggestMeTech, we provide a no-jargon guarantee to keep technical barriers out of your way. We rely on community-driven recommendations to ensure our advice solves real problems for people just like you. If you’ve realized your current setup is the main thing holding you back, check out our top-rated laptops for video editing to find a machine that can handle 4K exports without breaking a sweat.
Editing is a skill that grows with every cut you make. Don’t worry about being perfect on your first try; just focus on telling your story. We’re excited to see what you create. If you have questions about a specific tool or need hardware advice, join the conversation in the comments below and let us help you get started.
Frequently Asked Questions
What is the easiest video editing software for a total beginner?
Movavi Video Editor is widely considered the easiest option because it features the cleanest, most focused interface. It removes the clutter of professional tools, allowing you to focus on the timeline immediately. Filmora 14 is another top contender, offering a drag-and-drop experience that feels intuitive for those who have never edited before. Both tools prioritize a fast learning curve over deep, complex customization that often confuses new users.
Is there a free video editor without a watermark?
Yes, iMovie for Mac and Clipchamp for Windows are the most reliable free editors that don’t include watermarks on exported files. CapCut’s desktop version also allows for watermark-free exports if you use their specific export settings. While many “free” trials from paid brands include watermarks to encourage a purchase, these built-in system tools provide a clean finish for personal or social media projects without any hidden costs.
Can I edit 4K video on a basic laptop?
You can edit 4K video on a basic laptop if you utilize a technique called proxy editing. This process creates lower-resolution copies of your footage for the actual editing work, which puts significantly less strain on your CPU. Once your cuts are finished, the software swaps the high-quality 4K files back in for the final export. Without proxies, a basic laptop will likely lag or crash during playback due to the massive file sizes.
Is DaVinci Resolve too hard for beginners?
DaVinci Resolve 19 is a professional-grade tool that can be overwhelming for a total beginner. While the standard version is free, the interface is designed for Hollywood editors and requires significant time to master. If you want to finish a project in one afternoon, entry-level options are better. However, if you plan to become a professional colorist or editor, starting with Resolve is a powerful long-term investment for your career.
Do I need a graphics card (GPU) for video editing?
You don’t need a dedicated graphics card for simple 1080p cuts, but it becomes essential for 4K video or complex effects. A GPU handles the heavy lifting of rendering and playback, preventing your system from stuttering. If you’re using the best video editing software for beginners, a dedicated GPU will significantly speed up your final export times. For most hobbyists, modern integrated graphics are sufficient for short social media clips.
What is the best video editing software for YouTube beginners?
Wondershare Filmora 14 is the best video editing software for beginners starting a YouTube channel. It strikes a perfect balance between ease of use and creative power, offering built-in libraries for titles, music, and transitions. These features help you maintain a professional aesthetic without needing to design assets from scratch. Its one-click export settings for YouTube ensure your uploads meet the platform’s specific resolution and bitrate requirements every time.
How much RAM do I really need for video editing in 2026?
In 2026, 16GB of RAM is the recommended standard for a smooth, frustration-free editing experience. While you can technically run basic software with 8GB, you’ll likely encounter sluggish performance when layering multiple clips or adding effects. If you’re working with 4K footage or high-resolution assets, 32GB is the ideal goal to prevent crashes. Always check your software’s specific system requirements before starting a large project to avoid hardware bottlenecks during export.
Is CapCut better than Premiere Pro for beginners?
CapCut is better for beginners who need to produce social media content quickly and efficiently. It features a massive library of trending templates and effects that Premiere Pro lacks. However, Premiere Pro is superior for long-form storytelling and professional industry standards. If your goal is to make a quick, engaging TikTok, CapCut’s intuitive timeline is the clear winner. Choose Premiere Pro only if you intend to pursue a career in high-end video production.