
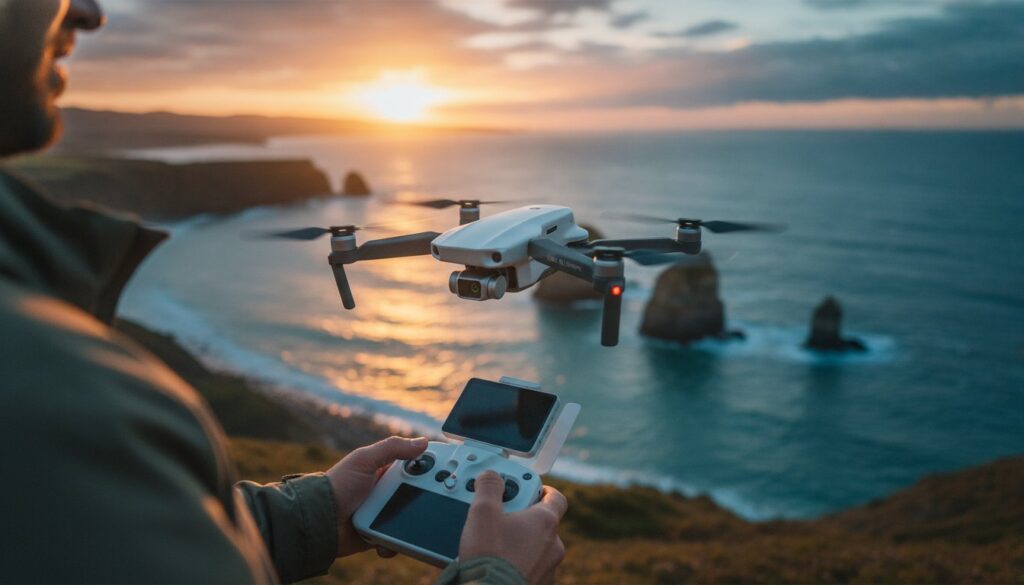
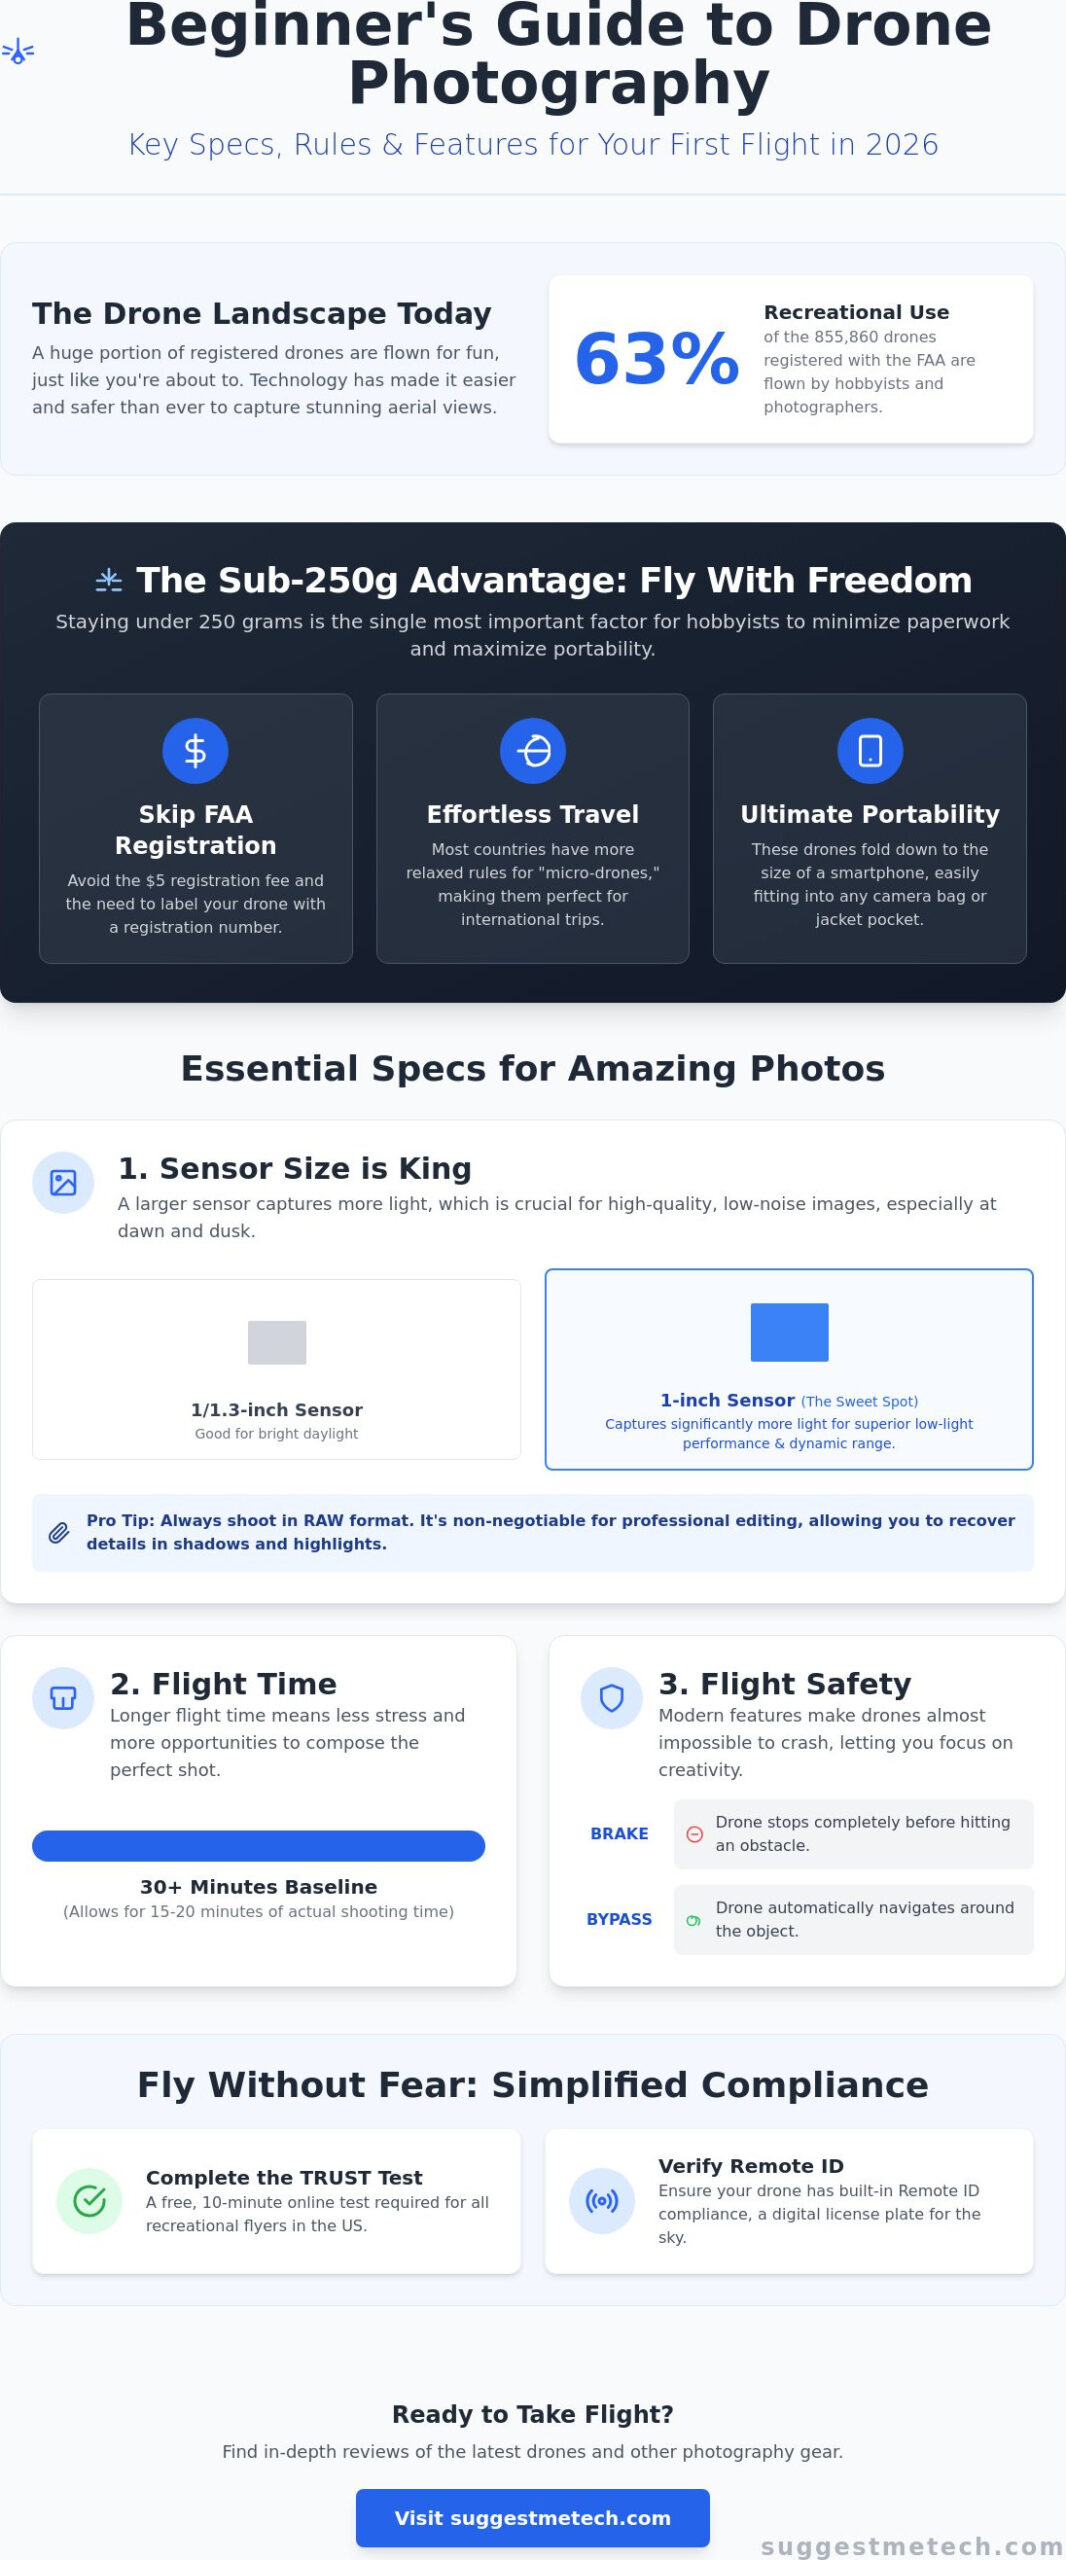
Did you know that 63% of the 855,860 drones currently registered with the FAA are for recreational use? Most of these pilots started exactly where you are. They wanted professional-grade aerial shots without the stress of a complex technical setup. It’s completely normal to feel a bit of pre-flight anxiety. You don’t want to crash an expensive device, and the maze of registration laws or FCC “Covered List” updates can feel overwhelming. Finding the best beginner drone for photography shouldn’t feel like a chore or a risk.
We’re here to help you discover the perfect balance of image quality, ease of use, and regulatory compliance. You’ll learn how to capture stunning RAW photos while relying on automatic obstacle avoidance to keep your gear safe. We will clarify why a 1-inch sensor matters more than megapixels and how staying under the 250-gram weight threshold helps you skip the $5 FAA registration fee. This guide compares the top models of 2026 to ensure your first flight is as portable and productive as possible.
Key Takeaways
- Identify the top-rated models of 2026, including the DJI Mini 5 Pro, to find the best beginner drone for photography that fits your budget.
- Learn how to leverage AI flight assistance and obstacle avoidance to fly with confidence even if you’ve never held a controller before.
- Understand the essential hardware specs, like why a 1-inch sensor is the “sweet spot” for capturing professional-grade images in low light.
- Simplify your legal requirements by mastering the 10-minute TRUST test and verifying your drone’s built-in Remote ID compliance.
- Set up a seamless mobile workflow to edit and share high-quality RAW files directly from the field using high-speed storage solutions.
Why 2026 is the Perfect Year to Start Drone Photography
2026 marks a major turning point for anyone looking to take their first flight. High-end sensors and AI flight assistance have finally merged into affordable, entry-level packages. If you look back at the history of aerial photography, you’ll see that capturing views from above used to be reserved for professionals with massive budgets and specialized equipment. Today, the best beginner drone for photography is less of a toy and more of a precision-stabilized flying camera that fits in your jacket pocket.
While traditional digital cameras capture beautiful ground-level details, they can’t replicate the top-down perspective that 70% of real estate listings now utilize to grab attention. Modern drones have shifted from being hard to fly to almost impossible to crash. This change is driven by 360-degree obstacle sensing, a feature that was once exclusive to flagship models costing thousands of dollars. Now, even entry-level drones can “see” trees, wires, and walls in every direction, allowing you to focus on the art of the shot rather than the fear of a collision.
Photography vs. Videography: The Stills-First Mindset
Beginners often fall for the megapixel marketing trap. In 2026, we prioritize sensor size and dynamic range over raw pixel count. A larger sensor captures more light; this is vital for clean shots during the “Blue Hour” when the sun is just below the horizon. Shooting in RAW format is a non-negotiable requirement for serious work. It provides the data you need to recover details in shadows and highlights during editing. Mechanical gimbals have also evolved; they allow you to take two-second long exposures while hovering hundreds of feet in the air without any motion blur.
The 250-Gram Revolution
Weight is the most critical specification for a hobbyist in the current regulatory environment. Drones are categorized into classes like C0 or Category 1 based on their mass. Staying under the 250-gram limit is a massive win for your wallet and your free time. Consider these benefits of the sub-250g class:
- Registration Savings: You bypass the $5 FAA registration fee required for heavier recreational aircraft.
- Travel Ease: Most countries have more relaxed rules for “micro-drones,” making them perfect for international vacations.
- Portability: These devices fold down to the size of a smartphone, fitting easily into any camera bag.
The sub-250g class is the gold standard for hobbyist photographers who want maximum freedom with minimum paperwork.
Essential Specs: What Actually Matters for Great Photos?
Many manufacturers push high-frame-rate video as the primary selling point, but for photographers, the conversation starts and ends with the sensor. In 2026, the best beginner drone for photography is defined by its ability to handle high-contrast scenes. You need a sensor that doesn’t just count pixels but makes every pixel count. A 1-inch sensor has become the industry benchmark for entry-level professionals, offering a physical surface area that captures significantly more light than the tiny chips found in older models.
Stress is the enemy of creativity. A flight time of 30 minutes or more is the baseline you should look for. By the time you launch, find your composition, and account for wind, you’ll have about 15 to 20 minutes of actual shooting time. Transmission range is equally vital. In urban environments, signal interference is common. Modern transmission systems ensure your remote screen stays crisp and lag-free, even if you’re flying a mile away to capture a distant landscape.
Understanding the CMOS Sensor
Think of the sensor as a bucket for light. A 1/1.3-inch sensor works well in bright daylight, but as light fades, a 1-inch sensor provides the dynamic range needed to keep shadows from turning into a grainy mess. Some 2026 models like the DJI Mini 5 Pro use pixel binning. This technology combines four adjacent pixels into one super pixel to reduce noise during low-light shoots. While 4/3 sensors are the gold standard, they usually push drones into higher weight classes. If you’re looking for more gear advice, check out our other technology reviews and guides to round out your kit.
Flight Safety Features for Photographers
Safety isn’t just about avoiding crashes; it’s about stability. GPS positioning allows your drone to lock onto multiple satellites, holding it perfectly still for long exposures. Obstacle avoidance systems now offer two main modes: Brake, which stops the drone cold, and Bypass, which maneuvers around the object automatically. Always check the FAA drone safety rules before your first flight to understand where these automated systems are most effective. Finally, the Return to Home (RTH) feature serves as your ultimate safety net. If you lose signal or your battery runs low, the drone automatically flies back to its takeoff point without any pilot input.
Capturing clean Blue Hour shots requires a wide aperture, typically around f/1.7 or f/2.8. Without this, you’ll be forced to crank up the ISO, which introduces digital noise that ruins large prints. When you’re hovering at 300 feet, you want the freedom to keep your shutter open longer, and a stabilized 1-inch sensor makes that possible for even the newest pilots.
The Top 3 Beginner Drones for Photography in 2026
Choosing the best beginner drone for photography depends on your specific goals, but three models currently dominate the market. Before you buy, you’ll need to decide between a standard set and a “Fly More Combo.” The standard set includes the drone, one battery, and a remote. We usually recommend the Fly More Combo. For example, the DJI Mini 5 Pro combo costs $1,099 at Amazon, but it includes three batteries and a charging hub. Having that extra flight time is essential when you’re learning to frame shots, as it prevents the frustration of a 20 minute session ending just as the light becomes perfect.
DJI Mini 5 Pro: The No-Brainer Choice
The DJI Mini 5 Pro is widely considered the best beginner drone for photography because it packs professional features into a 249g frame. Because it stays under the 250-gram threshold, you can skip the $5 FAA registration fee for recreational use. Photographers will appreciate the 48MP RAW stills and the ability to rotate the gimbal for true vertical shooting. This is a game changer for social media content. The “Pro” label isn’t just marketing; it includes 10-bit D-Log M color profiles. This allows you to capture a massive amount of data for post-processing, much like you would with a high-end mirrorless camera. If you want to dive deeper into the technical side of your first flight, this Beginner’s guide to drone photography provides excellent context on cinematic composition.
DJI Air 3S: For Those Who Want More Reach
If you live in a coastal or mountainous area, the DJI Air 3S is a superior choice due to its enhanced wind resistance. While the Mini is portable, the Air 3S offers a dual-camera system that includes a 70mm medium telephoto lens. This lens creates “background compression,” making distant mountains look larger and more imposing behind your subject. The Air 3S features a primary sensor that rivals the image quality of the latest flagship smartphones, providing professional-grade clarity in a compact frame. The standard kit starts at $1,099, but the Fly More Combo with the RC 2 controller is priced around $1,799 for those who want a dedicated screen on their remote.
Potensic Atom 2: The Best Value Entry Point
For those on a tighter budget, the Potensic Atom 2 has emerged as a serious contender. It offers a stabilized 4K camera and a 3-axis gimbal for a fraction of the cost of flagship models. The Fly More Combo is currently on sale for $360 at Amazon, down from its regular $480 price. It lacks some of the advanced AI tracking found in DJI models, but it provides a reliable, GPS-stabilized platform for learning the basics of aerial imaging. It’s a practical way to start your journey without a four-figure investment.
Rules, Regulations, and Safety: Flying Without the Fear
Legal hurdles often feel like the biggest barrier to entry for new pilots. You don’t want to accidentally wander into restricted airspace or face a heavy fine. The good news is that the regulatory environment in 2026 is much clearer than it was a few years ago. Every recreational pilot in the U.S. must pass The Recreational UAS Safety Test (TRUST). It’s a free, online, multiple-choice test that takes about 10 minutes. You can’t fail it; if you get a question wrong, the system lets you correct it until you pass. Just keep a digital copy of your certificate on your phone whenever you fly.
Technology has also made compliance automatic. Most drones released in 2026 come with Remote ID built-in. This acts like a digital license plate that broadcasts your drone’s location and identification to local authorities. To stay on the right side of the law, always check your flight path using apps like B4UFLY or the built-in maps in the DJI Fly app. These tools provide real-time updates on Temporary Flight Restrictions (TFRs) around stadiums or wildfires. If you’re still researching which model fits your needs, our technology reviews and guides can help you find a compliant aircraft that matches your skill level.
Registration Simplified
The 250-gram weight threshold is the most important number to remember. If you choose the best beginner drone for photography in the sub-250g category, you aren’t required to register your aircraft with the FAA for recreational use. For any drone weighing 250g or more, you must pay a $5 registration fee and label your drone with your unique registration number. This distinction is strictly for recreational flyers. If you plan to use your photos to sell real estate or for any business purpose, you’ll need a Part 107 Commercial Pilot Certificate regardless of the drone’s weight.
Pre-Flight Checklist
Safety starts before you even power on the motors. Always check the weather and the Kp-index, which measures solar activity that can interfere with your GPS signal. A high Kp-index can cause your drone to drift or lose its “Home Point” connection. Before takeoff, verify your battery health and ensure your Smart Return to Home (RTH) altitude is set higher than the tallest obstacle in the area. The golden rule of drone safety is Visual Line of Sight (VLOS). You must be able to see your drone with your own eyes at all times. This ensures you can spot birds, other aircraft, or changing weather conditions that your camera might miss. Following these simple steps makes your search for the best beginner drone for photography a much more rewarding experience.
From First Flight to First Print: Your Growth Path
Owning the best beginner drone for photography is just the start of your journey. To see professional results, you must master the technical side of data management and composition. High-speed MicroSD cards, specifically those with a V30 or V60 rating, are non-negotiable. These cards handle the massive data throughput required for 48MP RAW stills. If your card is too slow, you’ll experience lag or even lose your best shots during the write process. It’s a small investment that prevents a lot of frustration in the field.
In the sky, classic composition rules still apply. Use the Rule of Thirds to guide the viewer’s eye by enabling the grid lines on your remote screen. Place a lighthouse, a solitary tree, or a mountain peak at one of the grid intersections. Avoid centering the horizon; instead, place it on the lower third for sky-heavy sunset shots or the upper third for landscape-focused images. For more intensive editing, transferring files to a high-performance laptop allows you to use desktop-class software for professional color grading.
Post-Processing for Drones
Drone photos often look flat and desaturated when you first see them. This is intentional. RAW files are designed to preserve maximum detail in the shadows and highlights rather than look “finished” out of the camera. You’ll need to add contrast, saturation, and sharpness in post-processing to make the image pop. Apps like Lightroom Mobile or Snapseed are perfect for quick field edits. Since these high-resolution files are large, you should know how to clear cache on iPhone to ensure you have enough storage space for your daily captures.
Maintenance and Storage
Proper care extends the life of your equipment. Lithium-Polymer (LiPo) batteries are sensitive to temperature and charge levels. Never store them fully charged or completely empty for long periods; aim for a 50% to 60% charge if you aren’t flying for a week. Always check your propellers for hairline cracks or chips before every launch. Even a tiny imperfection can cause vibrations that ruin your photo’s sharpness or, worse, lead to a mid-air failure. Once you’ve polished your shots, join an online community to share your work and get constructive feedback.
SuggestMeTech’s Final Verdict
After evaluating image quality, ease of use, and portability, the DJI Mini 5 Pro remains the best beginner drone for photography in 2026. It offers the most complete package for those who want professional results without the regulatory weight of larger aircraft. If you need more reach or fly in high-wind areas, the DJI Air 3S is a powerful alternative. Whichever you choose, the key is to get out and fly as often as possible to develop your eye for aerial storytelling.
Ready to Capture the World From Above?
The barrier to entry for aerial imaging has never been lower. By choosing the best beginner drone for photography in the sub-250g class, you balance high-end sensor performance with minimal regulatory paperwork. You now have the knowledge to navigate the TRUST test, manage your RAW data, and maintain your gear for long-term success. Our 2026 model year testing and hands-on flight stability assessments are designed to help you bypass the learning curve and focus on the art of the shot.
We believe in providing practical, solution-oriented advice through our affiliate-supported independent reviews. If you’re looking to expand your creative toolkit beyond the sky, check out our full comparison of the best tech for creators to find the perfect editing station for your new high-resolution files. The view from 400 feet is waiting; it’s time to stop researching and start flying. We can’t wait to see the unique perspectives you capture.
Frequently Asked Questions
Do I need a license to fly a photography drone in 2026?
You don’t need a commercial pilot’s license for recreational flying, but you must carry proof of passing the free, online TRUST test. If your aircraft weighs 250 grams or more, you must also register it with the FAA for a $5 fee. For any flight intended to make money, such as real estate photography, a Part 107 Remote Pilot Certificate is mandatory regardless of the drone’s weight.
What happens if my drone loses connection with the remote?
Your drone will automatically initiate the Return to Home (RTH) procedure using its onboard GPS. It climbs to a pre-set safety altitude to avoid obstacles and flies back to the exact spot where it took off. Most modern models will also attempt to reconnect with the remote controller during the flight back. You can cancel the RTH and resume manual control as soon as the signal is restored.
Can I fly my drone at night for long-exposure photography?
Night flight is legal for recreational pilots if your drone is equipped with anti-collision lighting visible for at least three statute miles. These high-intensity strobes help other aircraft see you in the dark. For the best beginner drone for photography, night shots require a tripod-like hover stability. Ensure you are flying in an area where you can still maintain visual line of sight during the exposure.
Is the DJI Mini 5 Pro waterproof or windproof?
The DJI Mini 5 Pro is not waterproof, so you should avoid flying in rain, mist, or heavy fog to prevent short-circuiting the internal electronics. It features Level 5 wind resistance, which allows it to remain stable in winds up to 10.7 meters per second. While it handles breezy conditions well, its lightweight frame means it will struggle in gusty coastal environments compared to heavier models like the Air 3S.
How much should a beginner spend on their first photography drone?
A budget between $400 and $1,100 is the sweet spot for a high-quality entry point. At the lower end, you can find the Potensic Atom 2 Fly More Combo for around $360, which offers basic stabilization. For those seeking professional image quality and obstacle avoidance, spending closer to $1,099 for a DJI Mini 5 Pro ensures you won’t outgrow the technology within your first year of flying.
Can I use my smartphone as a screen for the drone remote?
Most entry-level kits include a standard remote controller that requires you to plug in your smartphone to act as the primary display. You’ll use the manufacturer’s app to view the live camera feed and adjust settings. If you prefer a more streamlined setup, you can upgrade to a Smart Controller with a built-in high-brightness screen, which eliminates the need to use your phone’s battery during flight.
Are there any drones better than DJI for beginners?
DJI holds 80% of the market because of its polished software, but brands like Autel and Potensic offer competitive alternatives. The Autel EVO Lite+ is a strong choice for those who want a 1-inch sensor without DJI’s geofencing restrictions. When searching for the best beginner drone for photography, consider your local regulations and whether you prefer an aircraft with more automated flight modes or one that offers a manual flight experience.
What is the maximum altitude I can legally fly my drone?
The legal altitude limit for recreational drones is 400 feet above ground level in uncontrolled airspace. If you are flying near a structure, you can technically fly 400 feet above that structure’s highest point, but only if you have specific authorization. Always use an airspace awareness app to verify the specific altitude limits for your current location, as some areas near airports may have lower ceilings for safety.